Overview
Welcome to Truck, a pure-Rust CAD kernel with modern, modular tools for geometric modeling. This book walks through meshes and B-reps with Truck.
The three core ideas
- Trendy tools: Rust for safety/performance; Truck’s mesh and B-rep crates for modern CAD workflows.
- Traditional arts (modernized): Re-implements classic CAD concepts (B-rep, NURBS) with Rust for stability and testability.
- Modular Design (Theseus’ Ship): Small, replaceable crates so you can swap or evolve parts independently without breaking the whole system.
Who this book is for
- Users: Build apps with Truck and other libraries.
- Developers: Create new geometric tools/elements on Truck.
- Contributors: Contribute directly to Truck’s codebase.
This tutorial focuses primarily on Users.
System requirements
Windows
- Keep Windows 10 up to date.
- Install Visual Studio C++ Build Tools (update if already installed).
- Install Rust: rustup.rs (choose MSVC toolchain;
rustup updateif already installed). - Notes: Tested with MSVC. Windows 8 is likely unsupported.
macOS
- Keep macOS up to date.
- Install Rust: rustup.rs (or
rustup updateif installed). - Notes: No additional GPU setup required for the chapters covered here.
Linux
- Not officially supported yet (limited testing).
- CI builds use Linux containers; official support is still evolving.
Mesh
In this chapter, we’ll learn how to work with polygon meshes—often simply called meshes. Most real-time graphics systems—like OpenGL, Vulkan, WebGPU, and game engines—expect 3D objects to be provided as meshes, so mastering them is essential for rendering and geometric processing.
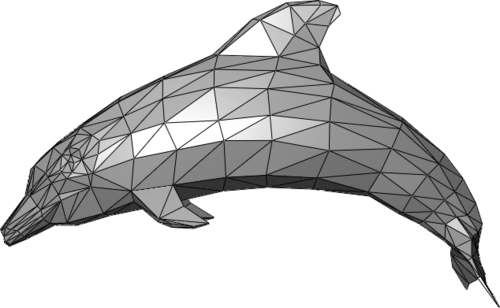 Source: Polygon mesh
What is a mesh?
A mesh is one of the most common ways to represent 3D shapes. It’s made of:
Why meshes?
Truck supports two broad categories for representing shapes:
- Polygon meshes: great for rendering, simple geometric manipulation, and interoperability with game engines, viewers, and simulation tools. Truck uses a mesh format based on Wavefront OBJ, one of the easiest and most widely supported formats in 3D graphics.
- Boundary representations (B-rep): describe shapes using curved surfaces (like NURBS), edges, and topology information. They are powerful for CAD and engineering, but not directly friendly for GPUs.
Converting shapes to meshes
If you create a model using B-rep, CSG, or another high-level representation, you will eventually convert (tessellate) it into a mesh before rendering. The modeling chapter demonstrates how to tessellate 3D objects built with the B-rep method, and the normals/filters chapter shows how to clean and optimize meshes for fast rendering.
A note about non-mesh rendering
While meshes are the standard, other representations exist—especially for special effects or procedural visuals. For example, raymarching can visualize shapes defined mathematically by:
These approaches don’t use polygons at all. However, they’re less common for CAD or engineering purposes, which is why meshes remain the primary representation in Truck.
Initial Project Setup
Use one library crate (truck_meshes) where each shape lives in its own file and is re-exported from src/lib.rs.
1) Create the workspace
Open your terminal:
(Windows users should use PowerShell)
cargo new --lib truck_meshes
cd truck_meshes
mkdir -p examples
mkdir -p output
Once you’ve cd’d into your new Rust project, launch your editor from that terminal so you’re editing the files you just created (e.g., run code . for VS Code).
2) Add dependencies
Inside the Cargo.toml file:
[dependencies]
truck-meshalgo = "0.4.0"
3) Seed src/lib.rs
Replace the default src/lib.rs contents from cargo new with this helper (write_polygon_mesh), then keep your module re-exports right under it as you add shapes throughout the chapter.
#![allow(unused)]
fn main() {
use truck_meshalgo::prelude::*;

/// Write any mesh to an OBJ file.
pub fn write_polygon_mesh(mesh: &PolygonMesh, path: &str) {
    let mut obj = std::fs::File::create(path).unwrap();
    obj::write(mesh, &mut obj).unwrap();
}

// Add shapes here as modules (one file per shape)
// pub mod triangle;
// pub use triangle::triangle;
}
File tree:
truck_meshes/
├─ Cargo.toml
├─ src/
│  └─ lib.rs
├─ examples/
│  └─
└─ output/   # exported OBJ files live here (create once)
Full code (`src/lib.rs`):
#![allow(unused)]
fn main() {
use truck_meshalgo::prelude::*;

/// Write any mesh to an OBJ file.
pub fn write_polygon_mesh(mesh: &PolygonMesh, path: &str) {
    let mut obj = std::fs::File::create(path).unwrap();
    obj::write(mesh, &mut obj).unwrap();
}

// Add shapes here as modules (one file per shape)
// pub mod triangle;
// pub use triangle::triangle;
}
Keep write_polygon_mesh generic—pass the path you want (e.g., output/triangle.obj) from each example rather than hardcoding the output folder inside the helper.
Polygons
First Triangle
Add the triangle module to lib.rs
src/lib.rs (root exports + helper):
#![allow(unused)]
fn main() {
use truck_meshalgo::prelude::*;

/// Write any mesh to an OBJ file.
pub fn write_polygon_mesh(mesh: &PolygonMesh, path: &str) {
    let mut obj = std::fs::File::create(path).unwrap();
    obj::write(mesh, &mut obj).unwrap();
}

pub mod triangle; //add this
pub use triangle::triangle; //add this
}
Explanation of pub mod and pub use
pub mod triangle;
mod triangle;loads thetriangle.rsfile as a module in the crate.- Making it
pubexposes that module so other files or external crate can access its contents.
pub use triangle::triangle;
use triangle::triangle;imports thetriangle()function into the crate root.- Making it
pubre-exports the function so users can calltruck_meshes::triangle()without the module path.
Construct Main Function
src/triangle.rs:
#![allow(unused)]
fn main() {
use std::iter::FromIterator;
use truck_meshalgo::prelude::*;

/// A single equilateral triangle in the XY plane.
pub fn triangle() -> PolygonMesh {

    //PLACE STEP 1-4 HERE

}
}
Step 1: Define vertex positions
#![allow(unused)]
fn main() {
    let positions = vec![
        Point3::new(0.0, 0.0, 0.0), //vertex index: 0
        Point3::new(1.0, 0.0, 0.0), //vertex index: 1
        Point3::new(0.5, f64::sqrt(3.0) / 2.0, 0.0), //vertex index: 2
    ];
}
Explanation
Create three Point3 coordinates that form an equilateral triangle on the XY plane. Two points sit on the X axis at y = 0, and the third is centered at x = 0.5 (midway between the base points) with y = sqrt(3)/2 so all sides are length 1. These positions are the raw vertex data the mesh will consume.
Step 2: Build attribute set
#![allow(unused)]
fn main() {
    let attrs = StandardAttributes {
        positions,
        ..Default::default()
    };
}
Explanation
Store the vertex positions in the StandardAttributes struct, which is where a mesh stores all vertex-level attributes (positions, normals, UVs, etc.). We will only set positions, and leave every other attribute at its default.
Step 3: Define mesh faces
#![allow(unused)]
fn main() {
    let faces = Faces::from_iter([[0, 1, 2]]);
}
Explanation
Define the triangle by listing the indices of its three vertices. Their counter-clockwise order (0 → 1 → 2) sets the face orientation, marking the triangle’s front side as facing the +Z direction.
Face orientation (important)
- CCW order (counter-clockwise) → face points toward you
- CW order (clockwise) → face points away
When looking at the outside, list triangle vertices counter-clockwise.

Step 4: Construct the mesh
#![allow(unused)]
fn main() {
    PolygonMesh::new(attrs, faces)

}
Explanation
Construct the mesh by passing the vertex attributes attrs and the face index list faces to PolygonMesh::new. Each face index (like [0, 1, 2]) points into the attribute array, telling the mesh which positions belong to that face.
The counter-clockwise order of these indices establishes the face orientation, which renderers use for lighting, backface culling, and generating smooth shading. PolygonMesh::new combines these into a fully defined mesh ready for rendering or OBJ export.
Export the triangle
Add a tiny example at examples/triangle.rs:
fn main() {
    let mesh = truck_meshes::triangle();
    truck_meshes::write_polygon_mesh(&mesh, "output/triangle.obj");
}
Run it:
cargo run --example triangle
View it
Open output/triangle.obj in Preview/3D Viewer/ParaView/Blender. You should see a single triangle.
Image below from ParaView.

File tree after this step
truck_meshes/
├─ Cargo.toml
├─ src/
│  ├─ lib.rs
│  └─ triangle.rs
├─ examples/
│  └─ triangle.rs   (optional helper to export)
└─ output/          # exported OBJ files (e.g., output/triangle.obj)
Full code:
src/lib.rs:
#![allow(unused)]
fn main() {
use truck_meshalgo::prelude::*;

pub fn write_polygon_mesh(mesh: &PolygonMesh, path: &str) {
    let mut obj = std::fs::File::create(path).unwrap();
    obj::write(mesh, &mut obj).unwrap();
}

pub mod triangle;
pub use triangle::triangle;
}
src/triangle.rs:
#![allow(unused)]
fn main() {
use std::iter::FromIterator;
use truck_meshalgo::prelude::*;

pub fn triangle() -> PolygonMesh {
    let positions = vec![
        Point3::new(0.0, 0.0, 0.0),
        Point3::new(1.0, 0.0, 0.0),
        Point3::new(0.5, f64::sqrt(3.0) / 2.0, 0.0),
    ];

    let attrs = StandardAttributes {
        positions,
        ..Default::default()
    };

    let faces = Faces::from_iter([[0, 1, 2]]);

    PolygonMesh::new(attrs, faces)
}
}
examples/triangle.rs:
fn main() {
    let mesh = truck_meshes::triangle();
    truck_meshes::write_polygon_mesh(&mesh, "output/triangle.obj");
}
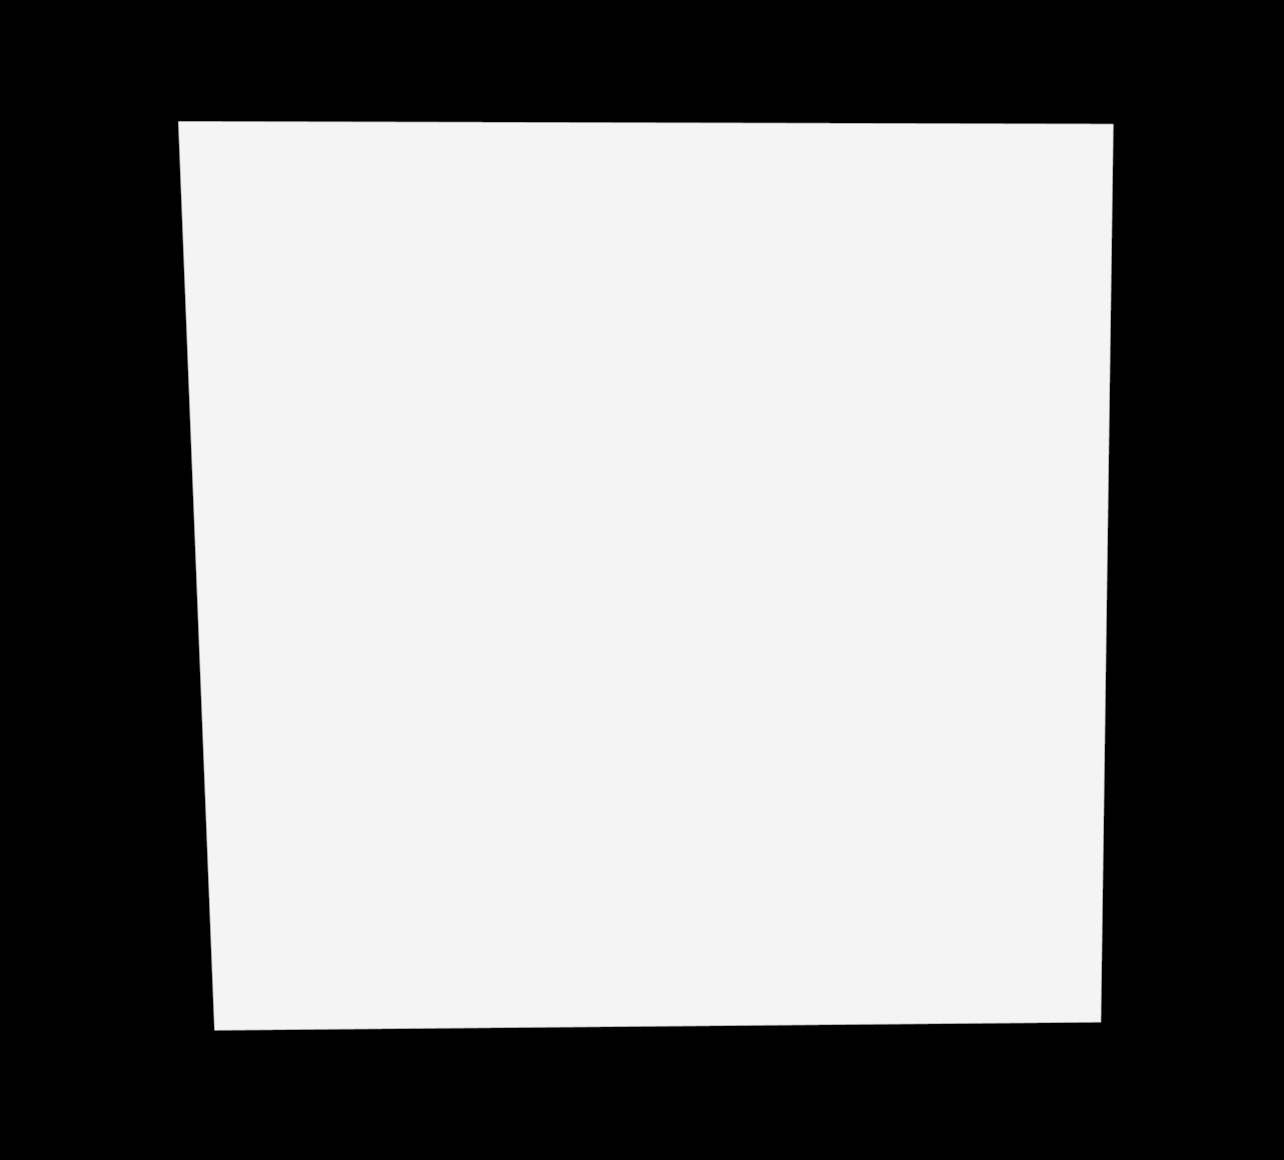
Square
Keep working in the same truck_meshes library so shapes can import each other, and place each shape in its own file.
Reference code: same setup as triangle, but with 4 vertices.
Add the square module
src/lib.rs additions:
#![allow(unused)]
fn main() {
use truck_meshalgo::prelude::*;

// ...keep `write_polygon_mesh` and `triangle()` above...
pub mod square; // add this
pub use square::square; // add this
}
Construct Main Function
src/square.rs:
#![allow(unused)]
fn main() {
use std::iter::FromIterator;
use truck_meshalgo::prelude::*;

/// A unit square in the XY plane made from two triangles.
pub fn square() -> PolygonMesh {

    //PLACE STEP 1-4 HERE

}
}
Step 1: Define vertex positions
#![allow(unused)]
fn main() {
    let positions = vec![
        Point3::new(0.0, 0.0, 0.0), // bottom-left [0]
        Point3::new(1.0, 0.0, 0.0), // bottom-right [1]
        Point3::new(1.0, 1.0, 0.0), // top-right [2]
        Point3::new(0.0, 1.0, 0.0), // top-left [3]
    ];
}
Step 2: Build attribute set
#![allow(unused)]
fn main() {
    let attrs = StandardAttributes {
        positions,
        ..Default::default()
    };
}
Step 3: Define mesh faces
#![allow(unused)]
fn main() {
    let faces = Faces::from_iter([
        [0, 1, 2], // bottom-right triangle
        [0, 2, 3], // top-left triangle
    ]);
}
Prefer a single quad? Swap the faces line in Step 3 for:
#![allow(unused)]
fn main() {
    let faces = Faces::from_iter([[0, 1, 2, 3]]);
}
Step 4: Construct the mesh
#![allow(unused)]
fn main() {
    PolygonMesh::new(attrs, faces)
}
Export the square
Add examples/square.rs:
fn main() {
    let mesh = truck_meshes::square();
    truck_meshes::write_polygon_mesh(&mesh, "output/square.obj");
}
Run it:
cargo run --example square
View it
Open output/square.obj in Preview/3D Viewer/ParaView/Blender. You should see a single square.
Image below from Preview (mac).
File tree after this step
truck_meshes/
├─ Cargo.toml
├─ src/
│  ├─ lib.rs
│  ├─ triangle.rs
│  └─ square.rs
├─ examples/
│  ├─ triangle.rs
│  └─ square.rs
└─ output/          # exported OBJ files (e.g., output/square.obj)
Full code:
src/lib.rs:
#![allow(unused)]
fn main() {
use truck_meshalgo::prelude::*;

/// Write any mesh to an OBJ file.
pub fn write_polygon_mesh(mesh: &PolygonMesh, path: &str) {
    let mut obj = std::fs::File::create(path).unwrap();
    obj::write(mesh, &mut obj).unwrap();
}

pub mod triangle;
pub use triangle::triangle;

pub mod square;
pub use square::square;
}
src/square.rs:
#![allow(unused)]
fn main() {
use std::iter::FromIterator;
use truck_meshalgo::prelude::*;

pub fn square() -> PolygonMesh {
    let positions = vec![
        Point3::new(0.0, 0.0, 0.0),
        Point3::new(1.0, 0.0, 0.0),
        Point3::new(1.0, 1.0, 0.0),
        Point3::new(0.0, 1.0, 0.0),
    ];

    let attrs = StandardAttributes {
        positions,
        ..Default::default()
    };

    let faces = Faces::from_iter([
        [0, 1, 2],
        [0, 2, 3],
    ]);

    PolygonMesh::new(attrs, faces)
}
}
examples/square.rs:
fn main() {
    let mesh = truck_meshes::square();
    truck_meshes::write_polygon_mesh(&mesh, "output/square.obj");
}
Polyhedrons
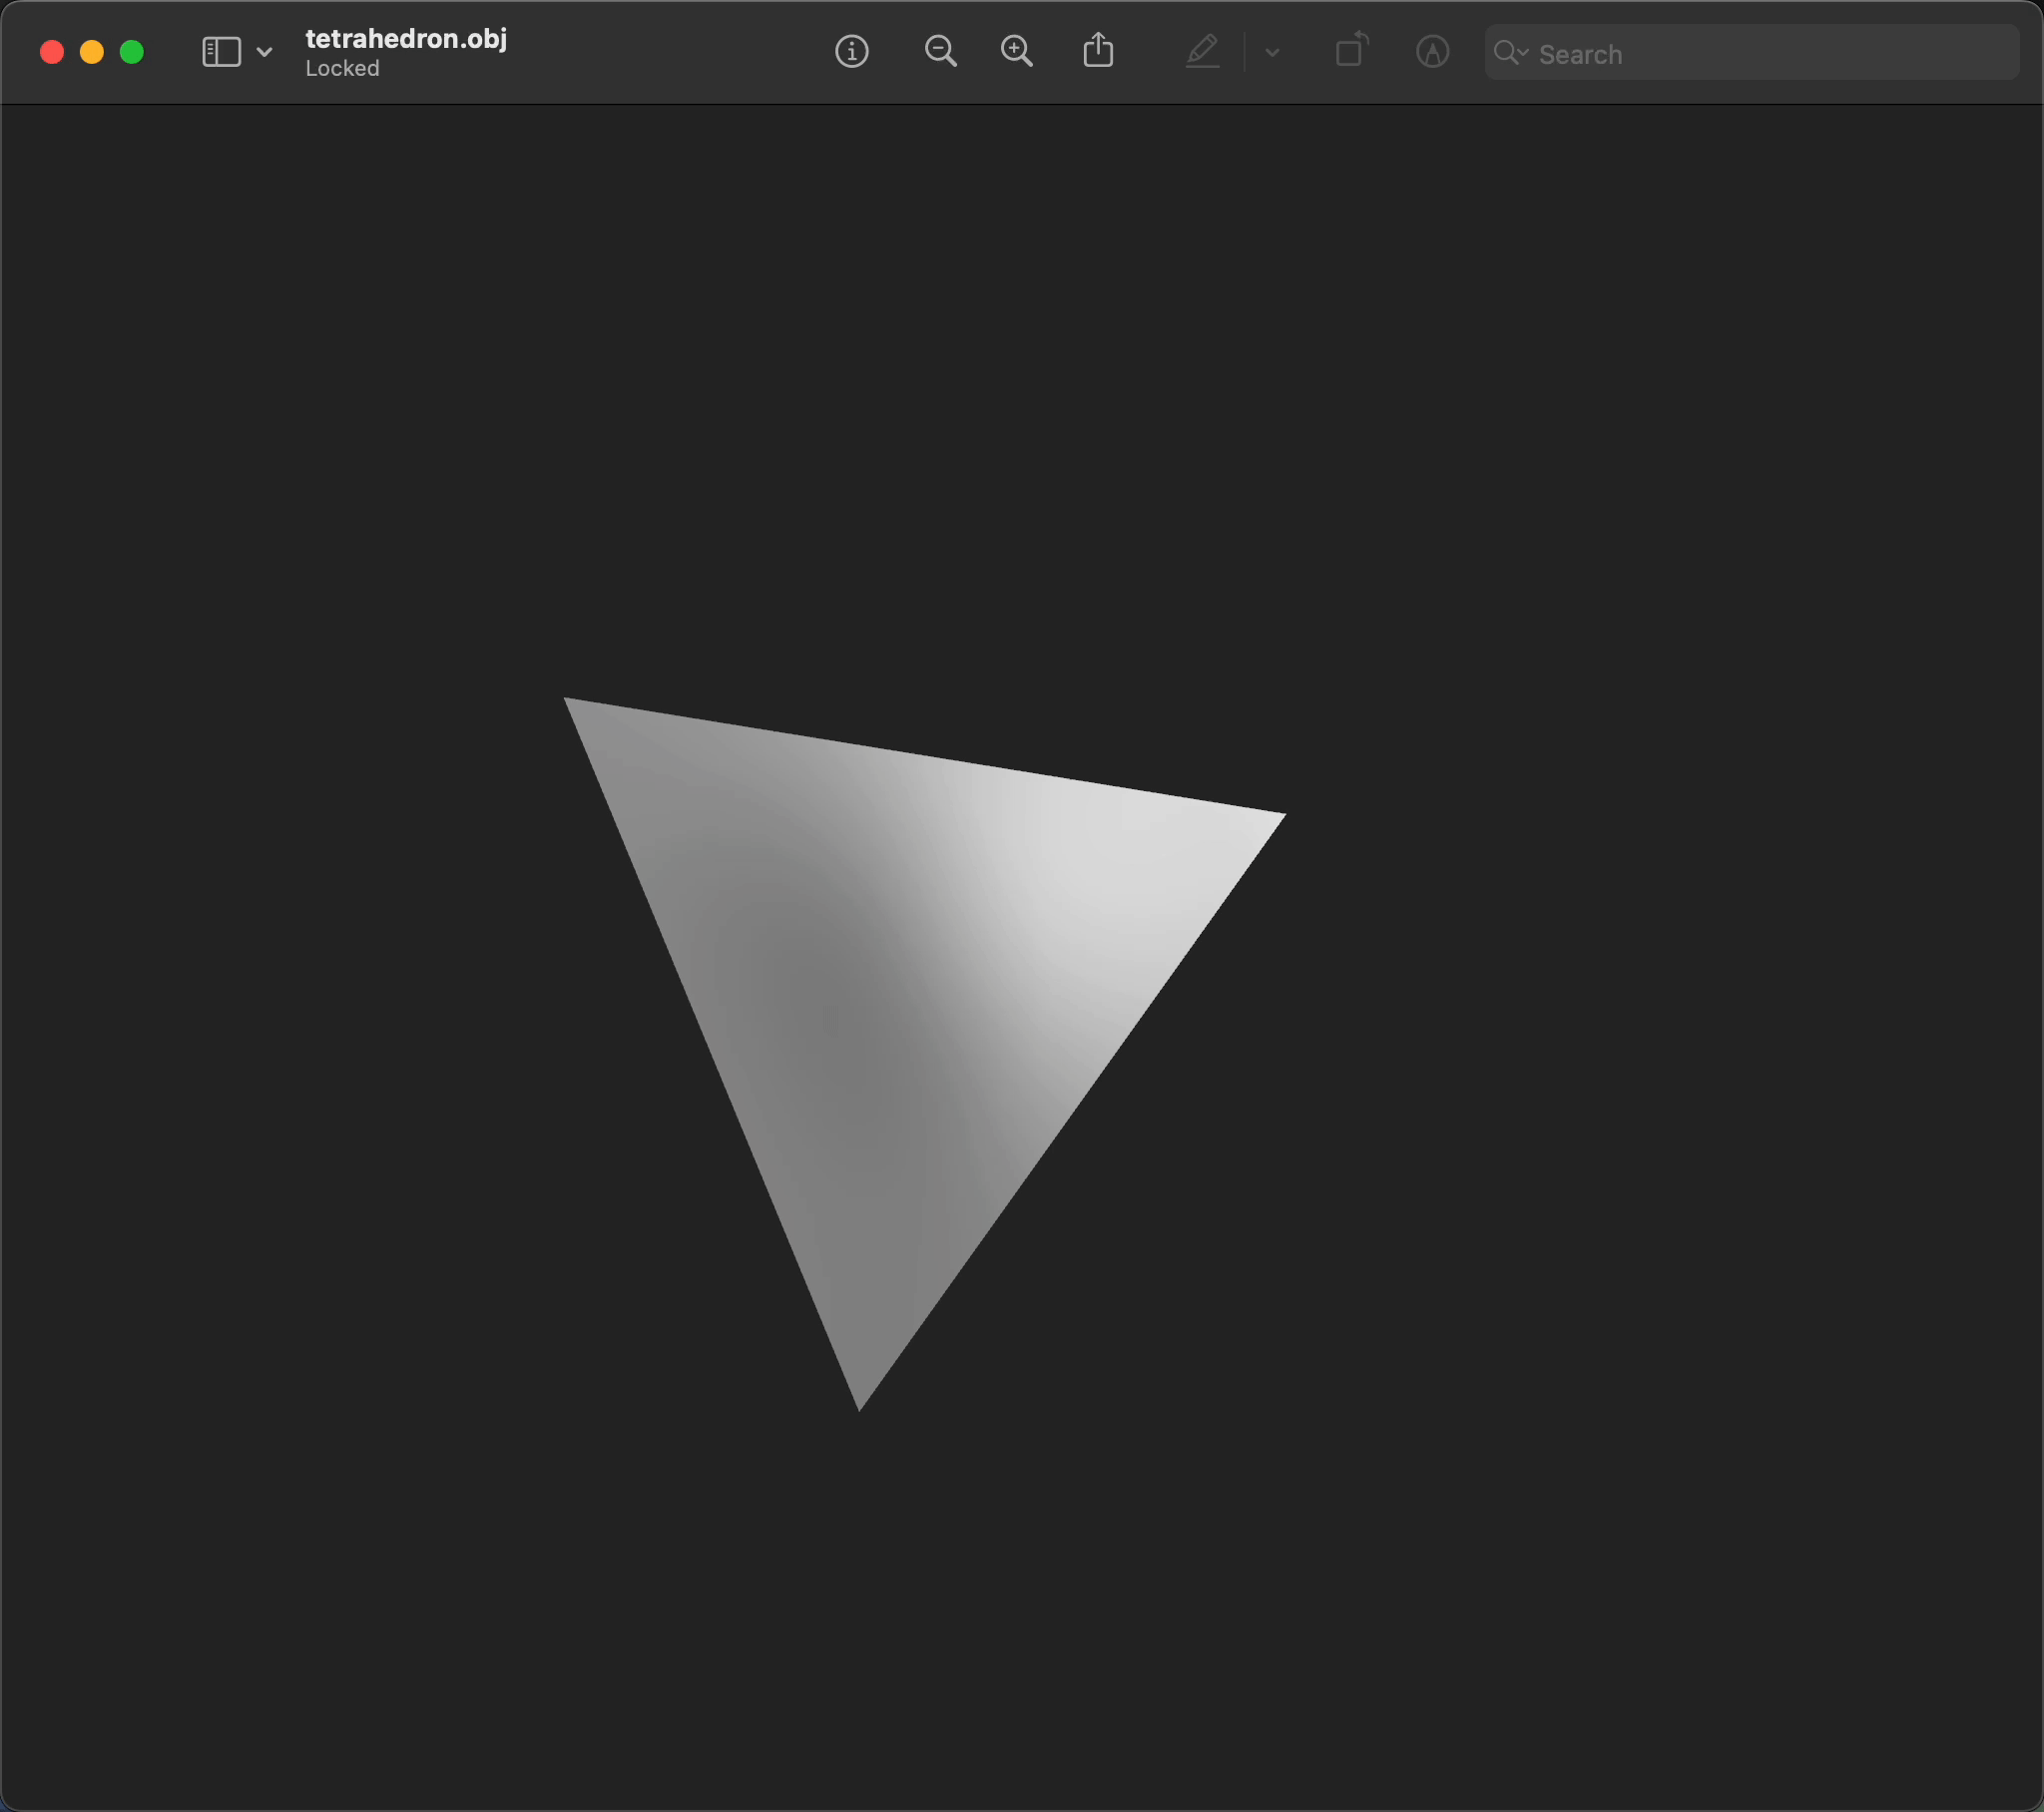
Tetrahedron (Equilateral Triangular Pyramid)
Add the tetrahedron module
src/lib.rs additions:
#![allow(unused)]
fn main() {
use truck_meshalgo::prelude::*;

// ...keep `write_polygon_mesh`, `triangle()`, and `square()` above...
pub mod tetrahedron; // add this
pub use tetrahedron::tetrahedron; // add this
}
Construct Main Function
src/tetrahedron.rs:
#![allow(unused)]
fn main() {
use std::iter::FromIterator;
use truck_meshalgo::prelude::*;

/// Equilateral tetrahedron (triangular pyramid).
pub fn tetrahedron() -> PolygonMesh {

    //PLACE STEP 1-4 HERE

}
}
Step 1: Define vertex positions
#![allow(unused)]
fn main() {
    let positions = vec![
        Point3::new(0.0, 0.0, 0.0), // base 1 [0]
        Point3::new(1.0, 0.0, 0.0), // base 2 [1]
        Point3::new(0.5, f64::sqrt(3.0) / 2.0, 0.0), // base 3 [2]
        Point3::new(0.5, f64::sqrt(3.0) / 6.0, f64::sqrt(6.0) / 3.0), // apex [3]
    ];
}
Step 2: Build attribute set
#![allow(unused)]
fn main() {
    let attrs = StandardAttributes {
        positions,
        ..Default::default()
    };
}
Step 3: Define mesh faces
#![allow(unused)]
fn main() {
    let faces = Faces::from_iter([
        [2, 1, 0], // base
        [0, 1, 3], // side 1
        [1, 2, 3], // side 2
        [2, 0, 3], // side 3
    ]);
}

Step 4: Construct the mesh
#![allow(unused)]
fn main() {
    PolygonMesh::new(attrs, faces)
}
Export the tetrahedron
Add examples/tetrahedron.rs:
fn main() {
    let mesh = truck_meshes::tetrahedron();
    truck_meshes::write_polygon_mesh(&mesh, "output/tetrahedron.obj");
}
What does the `&` mean in `&mesh`?
write_polygon_mesh expects a reference to a PolygonMesh, so &mesh borrows the mesh instead of moving it. That lets the function read the mesh without taking ownership, so you could keep using mesh afterward if needed.
Run it:
cargo run --example tetrahedron
View it
Open output/tetrahedron.obj in Preview/3D Viewer/ParaView/Blender. You should see a single tetrahedron.
gif below from Preview (mac).
File tree after this step
truck_meshes/
├─ Cargo.toml
├─ src/
│  ├─ lib.rs
│  ├─ triangle.rs
│  ├─ square.rs
│  └─ tetrahedron.rs
├─ examples/
│  ├─ triangle.rs
│  ├─ square.rs
│  └─ tetrahedron.rs
└─ output/          # exported OBJ files (e.g., output/tetrahedron.obj)
Full code:
src/lib.rs:
#![allow(unused)]
fn main() {
use truck_meshalgo::prelude::*;

/// Write any mesh to an OBJ file.
pub fn write_polygon_mesh(mesh: &PolygonMesh, path: &str) {
    let mut obj = std::fs::File::create(path).unwrap();
    obj::write(mesh, &mut obj).unwrap();
}

pub mod triangle;
pub use triangle::triangle;

pub mod square;
pub use square::square;

pub mod tetrahedron;
pub use tetrahedron::tetrahedron;
}
src/tetrahedron.rs:
#![allow(unused)]
fn main() {
use std::iter::FromIterator;
use truck_meshalgo::prelude::*;

pub fn tetrahedron() -> PolygonMesh {
    let positions = vec![
        Point3::new(0.0, 0.0, 0.0),
        Point3::new(1.0, 0.0, 0.0),
        Point3::new(0.5, f64::sqrt(3.0) / 2.0, 0.0),
        Point3::new(0.5, f64::sqrt(3.0) / 6.0, f64::sqrt(6.0) / 3.0),
    ];

    let attrs = StandardAttributes {
        positions,
        ..Default::default()
    };

    let faces = Faces::from_iter([
        [2, 1, 0],
        [0, 1, 3],
        [1, 2, 3],
        [2, 0, 3],
    ]);

    PolygonMesh::new(attrs, faces)
}
}
examples/tetrahedron.rs:
fn main() {
    let mesh = truck_meshes::tetrahedron();
    truck_meshes::write_polygon_mesh(&mesh, "output/tetrahedron.obj");
}
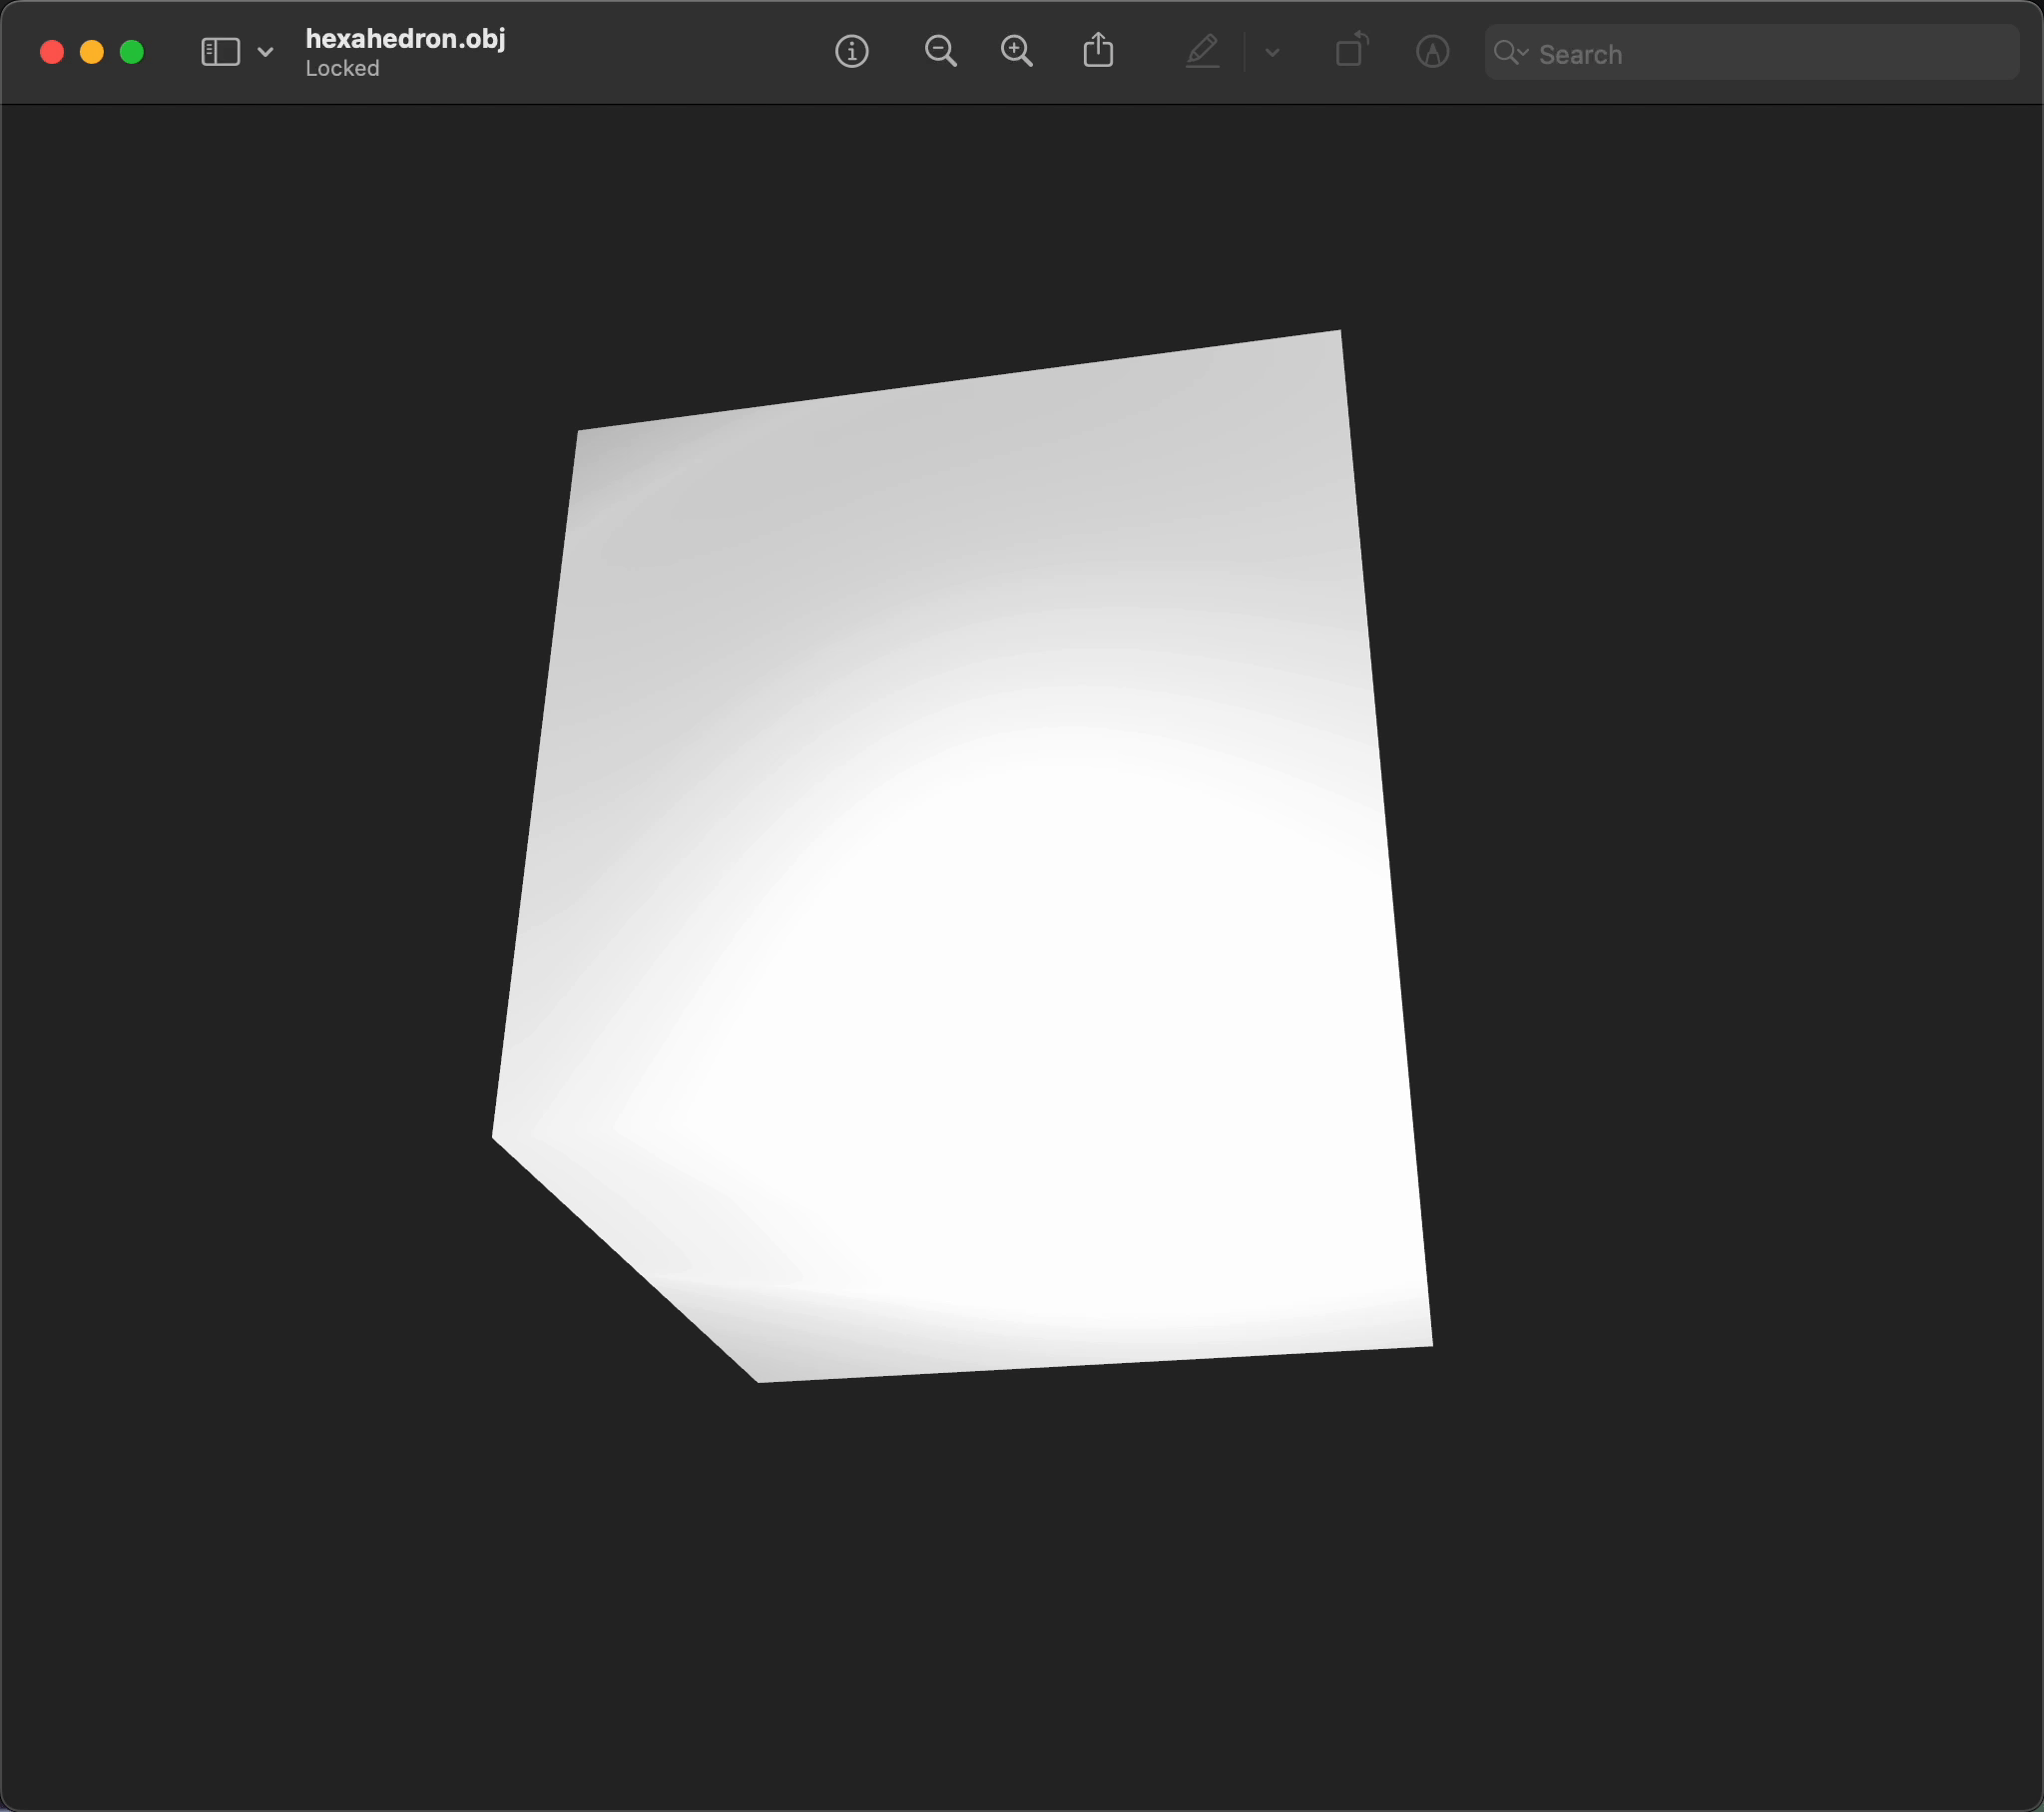
Hexahedron (Cube)
Add the hexahedron module
src/lib.rs additions:
#![allow(unused)]
fn main() {
use truck_meshalgo::prelude::*;

// ...keep earlier functions: write_polygon_mesh, triangle, square, tetrahedron...
pub mod hexahedron; //add this
pub use hexahedron::hexahedron; //add this
}
Construct Main Function
src/hexahedron.rs:
#![allow(unused)]
fn main() {
use std::iter::FromIterator;
use truck_meshalgo::prelude::*;

/// Unit cube (hexahedron) using quads.
pub fn hexahedron() -> PolygonMesh {

    //PLACE STEP 1-4 HERE

}
}
Step 1: Define vertex positions
#![allow(unused)]
fn main() {
    let positions = vec![
        Point3::new(0.0, 0.0, 0.0), //[0]
        Point3::new(1.0, 0.0, 0.0), //[1]
        Point3::new(1.0, 1.0, 0.0), //[2]
        Point3::new(0.0, 1.0, 0.0), //[3]
        Point3::new(0.0, 0.0, 1.0), //[4]
        Point3::new(1.0, 0.0, 1.0), //[5]
        Point3::new(1.0, 1.0, 1.0), //[6]
        Point3::new(0.0, 1.0, 1.0), //[7]
    ];
}
Step 2: Build attribute set
#![allow(unused)]
fn main() {
    let attrs = StandardAttributes {
        positions,
        ..Default::default()
    };

}
Step 3: Define mesh faces
#![allow(unused)]
fn main() {
    let faces = Faces::from_iter([
        [3, 2, 1, 0], // bottom
        [0, 1, 5, 4], // front
        [1, 2, 6, 5], // right
        [2, 3, 7, 6], // back
        [3, 0, 4, 7], // left
        [4, 5, 6, 7], // top
    ]);
}

Step 4: Construct the mesh
#![allow(unused)]
fn main() {
    PolygonMesh::new(attrs, faces)
}
Export the cube
Add examples/hexahedron.rs:
fn main() {
    let mesh = truck_meshes::hexahedron();
    truck_meshes::write_polygon_mesh(&mesh, "output/hexahedron.obj");
}
Run it:
cargo run --example hexahedron
View it
Open output/hexahedron.obj in Preview/3D Viewer/ParaView/Blender. You should see a single hexahedron.
gif below from Preview (mac).
File tree after this step
truck_meshes/
├─ Cargo.toml
├─ src/
│  ├─ lib.rs
│  ├─ triangle.rs
│  ├─ square.rs
│  ├─ tetrahedron.rs
│  └─ hexahedron.rs
├─ examples/
│  ├─ triangle.rs
│  ├─ square.rs
│  ├─ tetrahedron.rs
│  └─ hexahedron.rs
└─ output/          # exported OBJ files (e.g., output/hexahedron.obj)
Full code:
src/lib.rs:
#![allow(unused)]
fn main() {
use truck_meshalgo::prelude::*;

/// Write any mesh to an OBJ file.
pub fn write_polygon_mesh(mesh: &PolygonMesh, path: &str) {
    let mut obj = std::fs::File::create(path).unwrap();
    obj::write(mesh, &mut obj).unwrap();
}

pub mod triangle;
pub use triangle::triangle;

pub mod square;
pub use square::square;

pub mod tetrahedron;
pub use tetrahedron::tetrahedron;

pub mod hexahedron;
pub use hexahedron::hexahedron;
}
src/hexahedron.rs:
#![allow(unused)]
fn main() {
use std::iter::FromIterator;
use truck_meshalgo::prelude::*;

pub fn hexahedron() -> PolygonMesh {
    let positions = vec![
        Point3::new(0.0, 0.0, 0.0),
        Point3::new(1.0, 0.0, 0.0),
        Point3::new(1.0, 1.0, 0.0),
        Point3::new(0.0, 1.0, 0.0),
        Point3::new(0.0, 0.0, 1.0),
        Point3::new(1.0, 0.0, 1.0),
        Point3::new(1.0, 1.0, 1.0),
        Point3::new(0.0, 1.0, 1.0),
    ];

    let attrs = StandardAttributes {
        positions,
        ..Default::default()
    };

    let faces = Faces::from_iter([
        [3, 2, 1, 0],
        [0, 1, 5, 4],
        [1, 2, 6, 5],
        [2, 3, 7, 6],
        [3, 0, 4, 7],
        [4, 5, 6, 7],
    ]);

    PolygonMesh::new(attrs, faces)
}
}
examples/hexahedron.rs:
fn main() {
    let mesh = truck_meshes::hexahedron();
    truck_meshes::write_polygon_mesh(&mesh, "output/hexahedron.obj");
}
Octahedron
Add the octahedron module
src/lib.rs additions:
#![allow(unused)]
fn main() {
use truck_meshalgo::prelude::*;

// ...keep earlier functions: write_polygon_mesh, triangle, square, tetrahedron, hexahedron...
pub mod octahedron; // add this
pub use octahedron::octahedron; // add this
}
Construct Main Function
src/octahedron.rs:
#![allow(unused)]
fn main() {
use std::iter::FromIterator;
use truck_meshalgo::prelude::*;

/// Octahedron with vertices on the coordinate axes.
pub fn octahedron() -> PolygonMesh {

    //PLACE STEP 1-4 HERE

}
}
Step 1: Define vertex positions
#![allow(unused)]
fn main() {
    let positions = vec![
        Point3::new(-1.0, 0.0, 0.0), // (-X) [0]
        Point3::new(1.0, 0.0, 0.0),  // (+X) [1]
        Point3::new(0.0, -1.0, 0.0), // (-Y) [2]
        Point3::new(0.0, 1.0, 0.0),  // (+Y) [3]
        Point3::new(0.0, 0.0, -1.0), // (-Z) [4]
        Point3::new(0.0, 0.0, 1.0),  // (+Z) [5]
    ];
}
Step 2: Build attribute set
#![allow(unused)]
fn main() {
    let attrs = StandardAttributes {
        positions,
        ..Default::default()
    };
}
Step 3: Define mesh faces
#![allow(unused)]
fn main() {
    let faces = Faces::from_iter([
        [0, 4, 2],
        [2, 4, 1],
        [1, 4, 3],
        [3, 4, 0],
        [0, 2, 5],
        [2, 1, 5],
        [1, 3, 5],
        [3, 0, 5],
    ]);
}
Step 4: Construct the mesh
#![allow(unused)]
fn main() {
    PolygonMesh::new(attrs, faces)
}
Export the octahedron
Add examples/octahedron.rs:
fn main() {
    let mesh = truck_meshes::octahedron();
    truck_meshes::write_polygon_mesh(&mesh, "output/octahedron.obj");
}
Run it:
cargo run --example octahedron
View it
Open output/octahedron.obj in your preferred OBJ file viewer. You should see a single octahedron.
gif below from Bambu Studio.
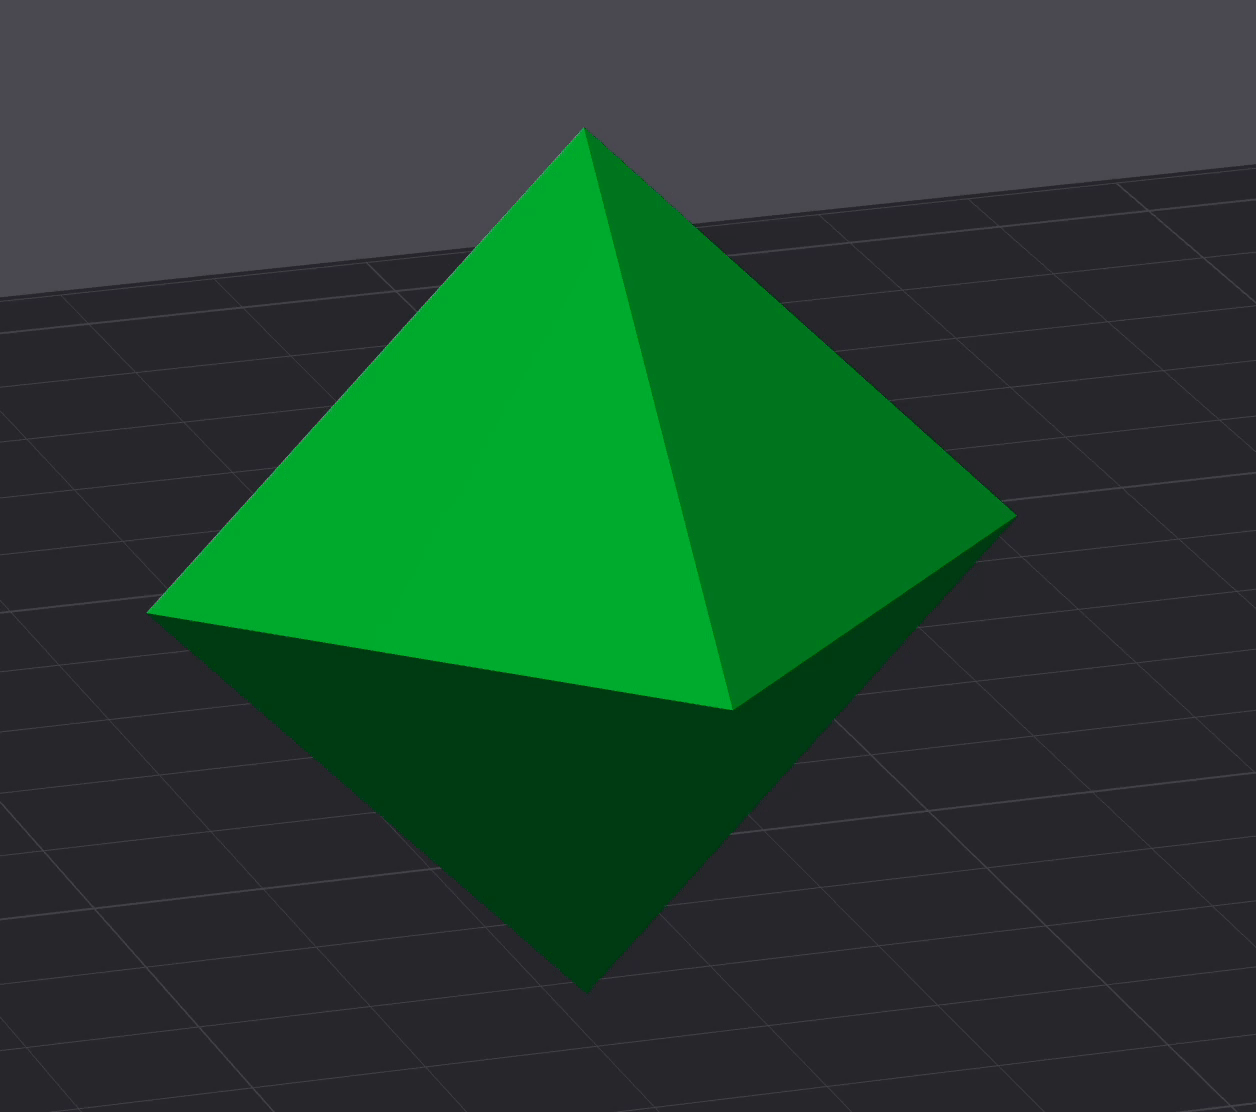
Note that Bambu Studio (forked from PrusaSlicer) only supports triangular meshes at the moment.
File tree after this step
truck_meshes/
├─ Cargo.toml
├─ src/
│  ├─ lib.rs
│  ├─ triangle.rs
│  ├─ square.rs
│  ├─ tetrahedron.rs
│  ├─ hexahedron.rs
│  └─ octahedron.rs
├─ examples/
│  ├─ triangle.rs
│  ├─ square.rs
│  ├─ tetrahedron.rs
│  ├─ hexahedron.rs
│  └─ octahedron.rs
└─ output/          # exported OBJ files (e.g., output/octahedron.obj)
Full code:
src/lib.rs:
#![allow(unused)]
fn main() {
use truck_meshalgo::prelude::*;

/// Write any mesh to an OBJ file.
pub fn write_polygon_mesh(mesh: &PolygonMesh, path: &str) {
    let mut obj = std::fs::File::create(path).unwrap();
    obj::write(mesh, &mut obj).unwrap();
}

pub mod triangle;
pub use triangle::triangle;

pub mod square;
pub use square::square;

pub mod tetrahedron;
pub use tetrahedron::tetrahedron;

pub mod hexahedron;
pub use hexahedron::hexahedron;

pub mod octahedron;
pub use octahedron::octahedron;
}
src/octahedron.rs:
#![allow(unused)]
fn main() {
use std::iter::FromIterator;
use truck_meshalgo::prelude::*;

pub fn octahedron() -> PolygonMesh {
    let positions = vec![
        Point3::new(-1.0, 0.0, 0.0),
        Point3::new(1.0, 0.0, 0.0),
        Point3::new(0.0, -1.0, 0.0),
        Point3::new(0.0, 1.0, 0.0),
        Point3::new(0.0, 0.0, -1.0),
        Point3::new(0.0, 0.0, 1.0),
    ];

    let attrs = StandardAttributes {
        positions,
        ..Default::default()
    };

    let faces = Faces::from_iter([
        [0, 4, 2],
        [2, 4, 1],
        [1, 4, 3],
        [3, 4, 0],
        [0, 2, 5],
        [2, 1, 5],
        [1, 3, 5],
        [3, 0, 5],
    ]);

    PolygonMesh::new(attrs, faces)
}
}
examples/octahedron.rs:
fn main() {
    let mesh = truck_meshes::octahedron();
    truck_meshes::write_polygon_mesh(&mesh, "output/octahedron.obj");
}
Dodecahedron
Add the dodecahedron module
src/lib.rs additions:
#![allow(unused)]
fn main() {
use truck_meshalgo::prelude::*;

// ...keep earlier functions through octahedron...
pub mod dodecahedron; // add this
pub use dodecahedron::dodecahedron; // add this
}
Construct Main Function
src/dodecahedron.rs:
#![allow(unused)]
fn main() {
use std::iter::FromIterator;
use truck_meshalgo::prelude::*;

/// Dodecahedron built from a cube plus roof vertices.
pub fn dodecahedron() -> PolygonMesh {

    //PLACE STEP 1-4 HERE

}
}
Step 1: Define helper scalars and vertex positions
#![allow(unused)]
fn main() {
    let a = f64::sqrt(3.0) / 3.0; // half cube edge
    let l = 2.0 * a / (1.0 + f64::sqrt(5.0)); // half dodeca edge
    let d = f64::sqrt(1.0 - l * l); // other coordinate by Pythagoras

    let positions = vec![
        Point3::new(-a, -a, -a), // [0]
        Point3::new(a, -a, -a), // [1]
        Point3::new(a, a, -a), // [2]
        Point3::new(-a, a, -a),// [3]
        Point3::new(-a, -a, a), // [4]
        Point3::new(a, -a, a), // [5]
        Point3::new(a, a, a), // [6]
        Point3::new(-a, a, a), // [7]
        Point3::new(d, -l, 0.0), // [8]
        Point3::new(d, l, 0.0), // [9]
        Point3::new(-d, l, 0.0), // [10]
        Point3::new(-d, -l, 0.0), // [11]
        Point3::new(0.0, d, -l), // [12]
        Point3::new(0.0, d, l), // [13]
        Point3::new(0.0, -d, l), // [14]
        Point3::new(0.0, -d, -l), // [15]
        Point3::new(-l, 0.0, d), // [16]
        Point3::new(l, 0.0, d), // [17]
        Point3::new(l, 0.0, -d), // [18]
        Point3::new(-l, 0.0, -d), // [19]
    ];
}
Explanation
The hexahedron’s edges act as diagonals of regular pentagons, so each dodecahedron edge equals the cube edge divided by the golden ratio. The “roof” vertices have one coordinate at zero; solving the remaining coordinate with the Pythagorean theorum gives the helper scalars a, l, and d used for all 20 vertex positions.
Step 2: Build attribute set
#![allow(unused)]
fn main() {
    let attrs = StandardAttributes {
        positions,
        ..Default::default()
    };
}
Step 3: Define mesh faces
#![allow(unused)]
fn main() {
    let faces = Faces::from_iter([
        [4, 14, 5, 17, 16],
        [6, 13, 7, 16, 17],
        [6, 17, 5, 8, 9],
        [4, 16, 7, 10, 11],
        [4, 11, 0, 15, 14],
        [1, 8, 5, 14, 15],
        [6, 9, 2, 12, 13],
        [3, 10, 7, 13, 12],
        [1, 15, 0, 19, 18],
        [1, 18, 2, 9, 8],
        [3, 12, 2, 18, 19],
        [3, 19, 0, 11, 10],
    ]);
}
Explanation
Each line is one pentagonal face, listing which vertices to connect by their index in the positions list (e.g., [4, 14, 5, 17, 16] means positions 4→14→5→17→16).
Step 4: Construct the mesh
#![allow(unused)]
fn main() {
    PolygonMesh::new(attrs, faces)
}
Export the dodecahedron
Add examples/dodecahedron.rs:
fn main() {
    let mesh = truck_meshes::dodecahedron();
    truck_meshes::write_polygon_mesh(&mesh, "output/dodecahedron.obj");
}
Run it:
cargo run --example dodecahedron
View it
Open output/dodecahedron.obj in your preferred OBJ file viewer. You should see a single dodecahedron.
gif below from Preview (mac).
File tree after this step
truck_meshes/
├─ Cargo.toml
├─ src/
│  ├─ lib.rs
│  ├─ triangle.rs
│  ├─ square.rs
│  ├─ tetrahedron.rs
│  ├─ hexahedron.rs
│  ├─ octahedron.rs
│  └─ dodecahedron.rs
├─ examples/
│  ├─ triangle.rs
│  ├─ square.rs
│  ├─ tetrahedron.rs
│  ├─ hexahedron.rs
│  ├─ octahedron.rs
│  └─ dodecahedron.rs
└─ output/          # exported OBJ files (e.g., output/dodecahedron.obj)
Full code:
src/lib.rs:
#![allow(unused)]
fn main() {
use truck_meshalgo::prelude::*;

pub fn write_polygon_mesh(mesh: &PolygonMesh, path: &str) {
    let mut obj = std::fs::File::create(path).unwrap();
    obj::write(mesh, &mut obj).unwrap();
}

pub mod triangle;
pub use triangle::triangle;

pub mod square;
pub use square::square;

pub mod tetrahedron;
pub use tetrahedron::tetrahedron;

pub mod hexahedron;
pub use hexahedron::hexahedron;

pub mod octahedron;
pub use octahedron::octahedron;

pub mod dodecahedron;
pub use dodecahedron::dodecahedron;
}
src/dodecahedron.rs:
#![allow(unused)]
fn main() {
use std::iter::FromIterator;
use truck_meshalgo::prelude::*;

pub fn dodecahedron() -> PolygonMesh {

    let a = f64::sqrt(3.0) / 3.0;
    let l = 2.0 * a / (1.0 + f64::sqrt(5.0));
    let d = f64::sqrt(1.0 - l * l);

    let positions = vec![
        Point3::new(-a, -a, -a),
        Point3::new(a, -a, -a),
        Point3::new(a, a, -a),
        Point3::new(-a, a, -a),
        Point3::new(-a, -a, a),
        Point3::new(a, -a, a),
        Point3::new(a, a, a),
        Point3::new(-a, a, a),
        Point3::new(d, -l, 0.0),
        Point3::new(d, l, 0.0),
        Point3::new(-d, l, 0.0),
        Point3::new(-d, -l, 0.0),
        Point3::new(0.0, d, -l),
        Point3::new(0.0, d, l),
        Point3::new(0.0, -d, l),
        Point3::new(0.0, -d, -l),
        Point3::new(-l, 0.0, d),
        Point3::new(l, 0.0, d),
        Point3::new(l, 0.0, -d),
        Point3::new(-l, 0.0, -d),
    ];

    let attrs = StandardAttributes {
        positions,
        ..Default::default()
    };

    let faces = Faces::from_iter([
        [4, 14, 5, 17, 16],
        [6, 13, 7, 16, 17],
        [6, 17, 5, 8, 9],
        [4, 16, 7, 10, 11],
        [4, 11, 0, 15, 14],
        [1, 8, 5, 14, 15],
        [6, 9, 2, 12, 13],
        [3, 10, 7, 13, 12],
        [1, 15, 0, 19, 18],
        [1, 18, 2, 9, 8],
        [3, 12, 2, 18, 19],
        [3, 19, 0, 11, 10],
    ]);

    PolygonMesh::new(attrs, faces)

}
}
examples/dodecahedron.rs:
fn main() {
    let mesh = truck_meshes::dodecahedron();
    truck_meshes::write_polygon_mesh(&mesh, "output/dodecahedron.obj");
}
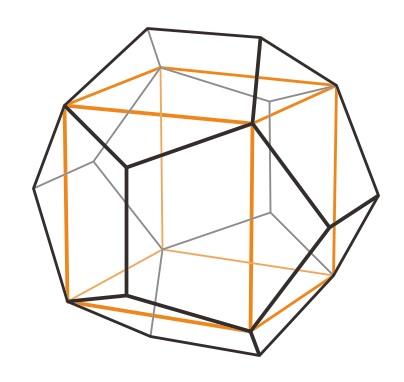
Icosahedron
An icosahedron is the dual of a dodecahedron: each dodecahedron face center becomes a vertex; the three centers around each original dodecahedron vertex become one triangle.
Steps:
- Find every dodecahedron face center.
- Normalize those centers to the unit sphere → 20 vertices.
- Group the three centers around each original dodecahedron vertex (corner) → 20 faces.

The yellow icosahedron appears if you remove the orange reference dodecahedron.
Add the icosahedron module
src/lib.rs additions:
#![allow(unused)]
fn main() {
use truck_meshalgo::prelude::*;

// ...keep earlier functions through dodecahedron...
pub mod icosahedron; // add this
pub use icosahedron::icosahedron; // add this
}
Construct Main Function
src/icosahedron.rs:
#![allow(unused)]
fn main() {
use truck_meshalgo::prelude::*;

/// Icosahedron via dual of a dodecahedron.
pub fn icosahedron() -> PolygonMesh {

    //PLACE STEPS 1-5 HERE

}
}
Step 1: Start from a dodecahedron
#![allow(unused)]
fn main() {
    let dodeca: PolygonMesh = crate::dodecahedron();
    let d_positions = dodeca.positions();
}
Step 2: Build vertex positions from face centroids
#![allow(unused)]
fn main() {
    let positions: Vec<Point3> = dodeca
        .face_iter()
        .map(|face| {
            let centroid = face
                .iter()
                .map(|v| d_positions[v.pos].to_vec())
                .sum::<Vector3>();
            Point3::from_vec(centroid.normalize())
        })
        .collect();
}
How this block builds icosahedron vertices
dodeca.face_iter()iterates over each pentagonal face of the source dodecahedron.- For each face we grab its five vertex positions from
d_positions, convert them to vectors, and sum them to get the face centroid vector. centroid.normalize()projects that centroid direction onto the unit sphere so every new vertex sits on radius 1.Point3::from_vec(...)turns the normalized direction back into a point; collecting the results gives the 20 icosahedron vertex positions.
Step 3: Build faces by collecting touching centroids
#![allow(unused)]
fn main() {
    let mut faces: Faces = (0..20)
        .map(|i| {
            dodeca
                .face_iter()
                .enumerate()
                .filter(|(_, f)| f.contains(&i.into()))
                .map(|(idx, _)| idx)
                .collect::<Vec<usize>>()
        })
        .collect();
}
How this block builds icosahedron faces
- We iterate over each of the 20 original dodecahedron vertices (
0..20), because every dodeca vertex becomes one icosahedron face. - For a given dodeca vertex
i, we scan all dodeca faces withface_iter().enumerate()and pick the ones that contain that vertex (f.contains(&i.into())). - The indices of those touching faces are collected into a
Vec<usize>; these indices correspond to the centroids computed earlier (which are now icosahedron vertices). - Gathering all 20 such lists yields the 20 triangular faces of the icosahedron.
Step 4: Fix winding so normals point outward
#![allow(unused)]
fn main() {
    faces.face_iter_mut().for_each(|face| {
        let p: Vec<Point3> = face.iter().map(|v| positions[v.pos]).collect();
        let center = p[0].to_vec() + p[1].to_vec() + p[2].to_vec();
        let normal = (p[1] - p[0]).cross(p[2] - p[0]).normalize();
        if center.dot(normal) < 0.0 {
            face.swap(0, 1);
        }
    });
}
How this block orients face winding
- For each face we fetch its three vertex positions (
p). - We sum the three position vectors to get a rough face center direction (
center); no division needed because only direction matters. - We compute the face normal via the cross product of two edges and normalize it.
- If the normal points inward (
center.dot(normal) < 0), we swap two vertices to flip the winding so the normal points outward.
Step 5: Construct the mesh
#![allow(unused)]
fn main() {
    PolygonMesh::new(
        StandardAttributes {
            positions,
            ..Default::default()
        },
        faces,
    )
}
Export the icosahedron
Add examples/icosahedron.rs:
use truck_meshalgo::prelude::NormalFilters;

fn main() {
    let mut mesh = truck_meshes::icosahedron();
    mesh.add_naive_normals(true); // optional, for shading
    truck_meshes::write_polygon_mesh(&mesh, "output/icosahedron.obj");
}
Run it:
cargo run --example icosahedron
View it
Open output/icosahedron.obj in your preferred OBJ file viewer. You should see a single icosahedron.
gif below from Bambu Studio.

File tree after this step
truck_meshes/
├─ Cargo.toml
├─ src/
│  ├─ lib.rs
│  ├─ triangle.rs
│  ├─ square.rs
│  ├─ tetrahedron.rs
│  ├─ hexahedron.rs
│  ├─ octahedron.rs
│  ├─ dodecahedron.rs
│  └─ icosahedron.rs
├─ examples/
│  ├─ triangle.rs
│  ├─ square.rs
│  ├─ tetrahedron.rs
│  ├─ hexahedron.rs
│  ├─ octahedron.rs
│  ├─ dodecahedron.rs
│  └─ icosahedron.rs
└─ output/          # exported OBJ files (e.g., output/icosahedron.obj)
Full code:
src/lib.rs:
#![allow(unused)]
fn main() {
use truck_meshalgo::prelude::*;

pub fn write_polygon_mesh(mesh: &PolygonMesh, path: &str) {
    let mut obj = std::fs::File::create(path).unwrap();
    obj::write(mesh, &mut obj).unwrap();
}

pub mod triangle;
pub use triangle::triangle;

pub mod square;
pub use square::square;

pub mod tetrahedron;
pub use tetrahedron::tetrahedron;

pub mod hexahedron;
pub use hexahedron::hexahedron;

pub mod octahedron;
pub use octahedron::octahedron;

pub mod dodecahedron;
pub use dodecahedron::dodecahedron;

pub mod icosahedron;
pub use icosahedron::icosahedron;
}
src/icosahedron.rs:
#![allow(unused)]
fn main() {
use truck_meshalgo::prelude::*;

pub fn icosahedron() -> PolygonMesh {
    let dodeca: PolygonMesh = crate::dodecahedron();
    let d_positions = dodeca.positions();

    let positions: Vec<Point3> = dodeca
        .face_iter()
        .map(|face| {
            let centroid = face
                .iter()
                .map(|v| d_positions[v.pos].to_vec())
                .sum::<Vector3>();
            Point3::from_vec(centroid.normalize())
        })
        .collect();

    let mut faces: Faces = (0..20)
        .map(|i| {
            dodeca
                .face_iter()
                .enumerate()
                .filter(|(_, f)| f.contains(&i.into()))
                .map(|(idx, _)| idx)
                .collect::<Vec<usize>>()
        })
        .collect();

    faces.face_iter_mut().for_each(|face| {
        let p: Vec<Point3> = face.iter().map(|v| positions[v.pos]).collect();
        let center = p[0].to_vec() + p[1].to_vec() + p[2].to_vec();
        let normal = (p[1] - p[0]).cross(p[2] - p[0]).normalize();
        if center.dot(normal) < 0.0 {
            face.swap(0, 1);
        }
    });

    PolygonMesh::new(
        StandardAttributes {
            positions,
            ..Default::default()
        },
        faces,
    )
}
}
examples/icosahedron.rs:
use truck_meshalgo::prelude::NormalFilters;

fn main() {
    let mut mesh = truck_meshes::icosahedron();
    mesh.add_naive_normals(true); // optional, for shading
    truck_meshes::write_polygon_mesh(&mesh, "output/icosahedron.obj");
}
Mesh Normals and Filters
This section explains how to clean up and refine meshes after constructing them from vertices and faces, and how we will reorganize the crate to support normals and filters.
As we scale our project, let's upgrade our directory layout so it can properly handle a little more scale without getting messy.
Current Directory Layout
truck_meshes/
├─ Cargo.toml
├─ src/
│  ├─ lib.rs
│  ├─ triangle.rs
│  ├─ square.rs
│  ├─ tetrahedron.rs
│  ├─ hexahedron.rs
│  ├─ octahedron.rs
│  ├─ dodecahedron.rs
│  └─ icosahedron.rs
└─ examples/
   ├─ triangle.rs
   ├─ square.rs
   ├─ tetrahedron.rs
   ├─ hexahedron.rs
   ├─ octahedron.rs
   ├─ dodecahedron.rs
   └─ icosahedron.rs
Target Directory Layout
truck_meshes/
├─ Cargo.toml
├─ src/
│  ├─ lib.rs
│  ├─ shapes/
│  │  ├─ mod.rs
│  │  ├─ triangle.rs
│  │  ├─ square.rs
│  │  ├─ tetrahedron.rs
│  │  ├─ hexahedron.rs
│  │  ├─ octahedron.rs
│  │  ├─ dodecahedron.rs
│  │  └─ icosahedron.rs
│  └─ utils/
│     ├─ mod.rs
│     └─ normal_helpers.rs
├─ examples/
│  ├─ triangle.rs
│  ├─ square.rs
│  ├─ tetrahedron.rs
│  ├─ hexahedron.rs
│  ├─ octahedron.rs
│  ├─ dodecahedron.rs
│  └─ icosahedron.rs
│
└─ output/          # exported OBJ files from examples
How we’ll modularize (step by step)
1) Create new directories
From the root directory of the project (truck_user_book/)
- Run:
mkdir -p src/shapes src/utils
2) Move shape modules
- Run:
mv src/triangle.rs src/square.rs src/tetrahedron.rs src/hexahedron.rs src/octahedron.rs src/dodecahedron.rs src/icosahedron.rs src/shapes/
3) Add src/shapes/mod.rs
- In
src/shapes/mod.rs, declare and re-export shapes:
#![allow(unused)]
fn main() {
pub mod triangle;
pub use triangle::triangle;

pub mod square;
pub use square::square;

pub mod tetrahedron;
pub use tetrahedron::tetrahedron;

pub mod hexahedron;
pub use hexahedron::hexahedron;

pub mod octahedron;
pub use octahedron::octahedron;

pub mod dodecahedron;
pub use dodecahedron::dodecahedron;

pub mod icosahedron;
pub use icosahedron::icosahedron;

}
4) Add the files for the normals helper module and functions
(we will insert the code for these on the next page)
- Add
src/utils/mod.rs:
touch src/utils/mod.rs
- Add
src/utils/normal_helpers.rs.
touch src/utils/normal_helpers.rs
5) Slim src/lib.rs
- Keep it lean with modules + re-exports:
#![allow(unused)]
fn main() {
use truck_meshalgo::prelude::*;

pub fn write_polygon_mesh(mesh: &PolygonMesh, path: &str) {
    let mut obj = std::fs::File::create(path).unwrap();
    obj::write(mesh, &mut obj).unwrap();
}

pub mod shapes;
pub use shapes::{
    triangle,
    square,
    tetrahedron,
    hexahedron,
    octahedron,
    dodecahedron,
    icosahedron,
};
}
On the next page, we’ll cover the normals helper functions, and how to wire them into our program.
Final file tree (after modularization)
truck_meshes/
├─ Cargo.toml
├─ src/
│  ├─ lib.rs
│  ├─ shapes/
│  │  ├─ mod.rs
│  │  ├─ triangle.rs
│  │  ├─ square.rs
│  │  ├─ tetrahedron.rs
│  │  ├─ hexahedron.rs
│  │  ├─ octahedron.rs
│  │  ├─ dodecahedron.rs
│  │  └─ icosahedron.rs
│  └─ utils/
│     ├─ mod.rs
│     └─ normal_helpers.rs
├─ examples/
│  ├─ triangle.rs
│  ├─ square.rs
│  ├─ tetrahedron.rs
│  ├─ hexahedron.rs
│  ├─ octahedron.rs
│  ├─ dodecahedron.rs
│  └─ icosahedron.rs
│
└─ output/          # exported OBJ files from examples
Full code:
src/lib.rs
#![allow(unused)]
fn main() {
use truck_meshalgo::prelude::*;

pub fn write_polygon_mesh(mesh: &PolygonMesh, path: &str) {
    let mut obj = std::fs::File::create(path).unwrap();
    obj::write(mesh, &mut obj).unwrap();
}

pub mod shapes;
pub use shapes::{
    triangle,
    square,
    tetrahedron,
    hexahedron,
    octahedron,
    dodecahedron,
    icosahedron,
};

}
src/shapes/mod.rs
#![allow(unused)]
fn main() {
pub mod triangle;
pub use triangle::triangle;

pub mod square;
pub use square::square;

pub mod tetrahedron;
pub use tetrahedron::tetrahedron;

pub mod hexahedron;
pub use hexahedron::hexahedron;

pub mod octahedron;
pub use octahedron::octahedron;

pub mod dodecahedron;
pub use dodecahedron::dodecahedron;

pub mod icosahedron;
pub use icosahedron::icosahedron;
}
Normal Helper Modules
Truck has normal filters, but no helper functions for manually computing face or vertex normals, so we provide our own utilities here.
Implement Functions in src/utils/normal_helpers.rs
Import dependencies
#![allow(unused)]
fn main() {
use truck_meshalgo::prelude::*;
}
compute_face_normals
#![allow(unused)]
fn main() {
/// Returns one normalized face normal per polygon.
pub fn compute_face_normals(mesh: &PolygonMesh) -> Vec<Vector3> {
    let positions = mesh.positions();
    mesh.face_iter()
        .map(|face| {
            // Need at least three vertices to form a plane
            if face.len() < 3 {
                return Vector3::zero();
            }
            // First three positions define the face plane
            let p0 = positions[face[0].pos];
            let p1 = positions[face[1].pos];
            let p2 = positions[face[2].pos];
            let n = (p1 - p0).cross(p2 - p0);
            // Skip degenerate/collinear faces
            if n.magnitude2() < 1e-12 {
                return Vector3::zero();
            }
            n.normalize()
        })
        .collect()
}
}
What it does + example
Derives a normalized face normal from the first three vertices of each polygon. Degenerate (cannot form a valid surface) or collinear (vertices all lie on the same straight line.) faces yield Vector3::zero(), enabling later routines to detect and correct them.
Example
#![allow(unused)]
fn main() {
let mut mesh = build_mesh();
let face_normals = compute_face_normals(&mesh);
mesh.attributes_mut().add_face_normals(face_normals);
}
compute_vertex_normals
#![allow(unused)]
fn main() {
/// Returns one normalized vertex normal per vertex (averaged from faces).
pub fn compute_vertex_normals(mesh: &PolygonMesh) -> Vec<Vector3> {
    let positions = mesh.positions();
    let face_normals = compute_face_normals(mesh);

    let mut vertex_normals = vec![Vector3::zero(); positions.len()];
    for (face_idx, face) in mesh.face_iter().enumerate() {
        let n = face_normals[face_idx];
        // Accumulate adjacent face normals onto each vertex
        for v in face {
            vertex_normals[v.pos] += n;
        }
    }
    // Normalize summed vectors so each vertex normal is unit length
    for n in vertex_normals.iter_mut() {
        *n = n.normalize();
    }
    vertex_normals
}
}
What it does + example
Accumulates the face normals that touch each vertex and normalizes the sum so shared vertices shade smoothly across adjacent polygons.
Example
#![allow(unused)]
fn main() {
let mut mesh = load_mesh();
let vertex_normals = compute_vertex_normals(&mesh);
mesh.attributes_mut().add_vertex_normals(vertex_normals);
}
add_face_normals
#![allow(unused)]
fn main() {
/// Computes and attaches a normal per face, wiring each vertex in the face to that normal.
pub fn add_face_normals(mesh: &mut PolygonMesh) {
    let normals = compute_face_normals(mesh); // one normal per polygon
    let editor = mesh.editor();
    editor.attributes.normals = normals; // store normals into attributes
    for (idx, face) in editor.faces.face_iter_mut().enumerate() {
        for v in face.iter_mut() {
            v.nor = Some(idx); // point each vertex's normal index to its face normal
        }
    }
}
}
What it does + example
Computes per-face normals with compute_face_normals and wires each vertex in a face to that face's normal index.
Example
#![allow(unused)]
fn main() {
let mut mesh = icosahedron();
add_face_normals(&mut mesh);
write_polygon_mesh(&mesh, "output/icosahedron_flat.obj");
}
add_vertex_normals
#![allow(unused)]
fn main() {
/// Computes and attaches a normal per vertex, wiring indices to match position indices.
pub fn add_vertex_normals(mesh: &mut PolygonMesh) {
    let normals = compute_vertex_normals(mesh); // smooth normals per vertex
    let editor = mesh.editor();
    editor.attributes.normals = normals; // store normals into attributes
    for face in editor.faces.face_iter_mut() {
        for v in face.iter_mut() {
            v.nor = Some(v.pos); // normal index aligns with vertex position index
        }
    }
}
}
What it does + example
Computes smooth vertex normals using compute_vertex_normals and stores them so each vertex reuses its own normal index.
Example
#![allow(unused)]
fn main() {
let mut mesh = icosahedron();
add_vertex_normals(&mut mesh);
write_polygon_mesh(&mesh, "output/icosahedron_smooth.obj");
}
normalize_vertex_normals
#![allow(unused)]

fn main() {
/// Normalizes any normals currently stored on the mesh in-place.
pub fn normalize_vertex_normals(mesh: &mut PolygonMesh) {
    let editor = mesh.editor();
    for n in editor.attributes.normals.iter_mut() {
        *n = n.normalize(); // keep direction, ensure unit length
    }
}

}
What it does + example
Renormalizes all stored normals in place, leaving their directions unchanged; if no normals exist, nothing happens.
Example
#![allow(unused)]
fn main() {
let mut mesh = mesh_with_normals();
// ... edit or mix normals ...
normalize_vertex_normals(&mut mesh);
}
Add the following re-exports to src/utils/mod.rs
#![allow(unused)]
fn main() {
pub mod normal_helpers;
pub use normal_helpers::{
    compute_face_normals,
    compute_vertex_normals,
    add_face_normals,
    add_vertex_normals,
    normalize_vertex_normals,
};

}
Add the normal helpers re-exports to src/lib.rs
#![allow(unused)]
fn main() {
pub mod utils;
pub use utils::normal_helpers::{
    compute_face_normals,
    compute_vertex_normals,
    add_face_normals,
    add_vertex_normals,
    normalize_vertex_normals,
};
}
Verify everything works now with cargo check
Run
cargo check
Next page, we will apply these functions to an Icosahedron
Directory layout (modular)
truck_meshes/
├─ Cargo.toml
├─ src/
│  ├─ lib.rs
│  ├─ shapes/
│  │  ├─ mod.rs
│  │  ├─ triangle.rs
│  │  ├─ square.rs
│  │  ├─ tetrahedron.rs
│  │  ├─ hexahedron.rs
│  │  ├─ octahedron.rs
│  │  ├─ dodecahedron.rs
│  │  └─ icosahedron.rs
│  └─ utils/
│     ├─ mod.rs
│     └─ normal_helpers.rs
├─ examples/
│  ├─ triangle.rs
│  ├─ square.rs
│  ├─ tetrahedron.rs
│  ├─ hexahedron.rs
│  ├─ octahedron.rs
│  ├─ dodecahedron.rs
│  └─ icosahedron.rs
│
└─ output/          # exported OBJ files from examples
Full code:
src/utils/normal_helpers.rs
#![allow(unused)]
fn main() {
use truck_meshalgo::prelude::*;

/// Returns one normalized face normal per polygon.
pub fn compute_face_normals(mesh: &PolygonMesh) -> Vec<Vector3> {
    let positions = mesh.positions();
    mesh.face_iter()
        .map(|face| {
            // Need at least three vertices to form a plane
            if face.len() < 3 {
                return Vector3::zero();
            }
            // First three positions define the face plane
            let p0 = positions[face[0].pos];
            let p1 = positions[face[1].pos];
            let p2 = positions[face[2].pos];
            let n = (p1 - p0).cross(p2 - p0);
            // Skip degenerate/collinear faces
            if n.magnitude2() < 1e-12 {
                return Vector3::zero();
            }
            n.normalize()
        })
        .collect()
}

/// Returns one normalized vertex normal per vertex (averaged from faces).
pub fn compute_vertex_normals(mesh: &PolygonMesh) -> Vec<Vector3> {
    let positions = mesh.positions();
    let face_normals = compute_face_normals(mesh);

    let mut vertex_normals = vec![Vector3::zero(); positions.len()];
    for (face_idx, face) in mesh.face_iter().enumerate() {
        let n = face_normals[face_idx];
        // Accumulate adjacent face normals onto each vertex
        for v in face {
            vertex_normals[v.pos] += n;
        }
    }
    // Normalize summed vectors so each vertex normal is unit length
    for n in vertex_normals.iter_mut() {
        *n = n.normalize();
    }
    vertex_normals
}

/// Computes and attaches a normal per face, wiring each vertex in the face to that normal.
pub fn add_face_normals(mesh: &mut PolygonMesh) {
    let normals = compute_face_normals(mesh);
    let editor = mesh.editor();
    editor.attributes.normals = normals;
    for (idx, face) in editor.faces.face_iter_mut().enumerate() {
        for v in face.iter_mut() {
            v.nor = Some(idx);
        }
    }
}

/// Computes and attaches a normal per vertex, wiring indices to match position indices.
pub fn add_vertex_normals(mesh: &mut PolygonMesh) {
    let normals = compute_vertex_normals(mesh);
    let editor = mesh.editor();
    editor.attributes.normals = normals;
    for face in editor.faces.face_iter_mut() {
        for v in face.iter_mut() {
            v.nor = Some(v.pos);
        }
    }
}

/// Normalizes any normals currently stored on the mesh in-place.
pub fn normalize_vertex_normals(mesh: &mut PolygonMesh) {
    let editor = mesh.editor();
    for n in editor.attributes.normals.iter_mut() {
        *n = n.normalize();
    }
}
}
src/utils/mod.rs
#![allow(unused)]

fn main() {
pub mod normal_helpers;
pub use normal_helpers::{
    compute_face_normals,
    compute_vertex_normals,
    add_face_normals,
    add_vertex_normals,
    normalize_vertex_normals,
};
}
src/lib.rs
#![allow(unused)]
fn main() {
use truck_meshalgo::prelude::*;

pub fn write_polygon_mesh(mesh: &PolygonMesh, path: &str) {
    let mut obj = std::fs::File::create(path).unwrap();
    obj::write(mesh, &mut obj).unwrap();
}

pub mod shapes;
pub use shapes::{
    triangle,
    square,
    tetrahedron,
    hexahedron,
    octahedron,
    dodecahedron,
    icosahedron,
};

pub mod utils;
pub use utils::normal_helpers::{
    compute_face_normals,
    compute_vertex_normals,
    add_face_normals,
    add_vertex_normals,
    normalize_vertex_normals,
};
}
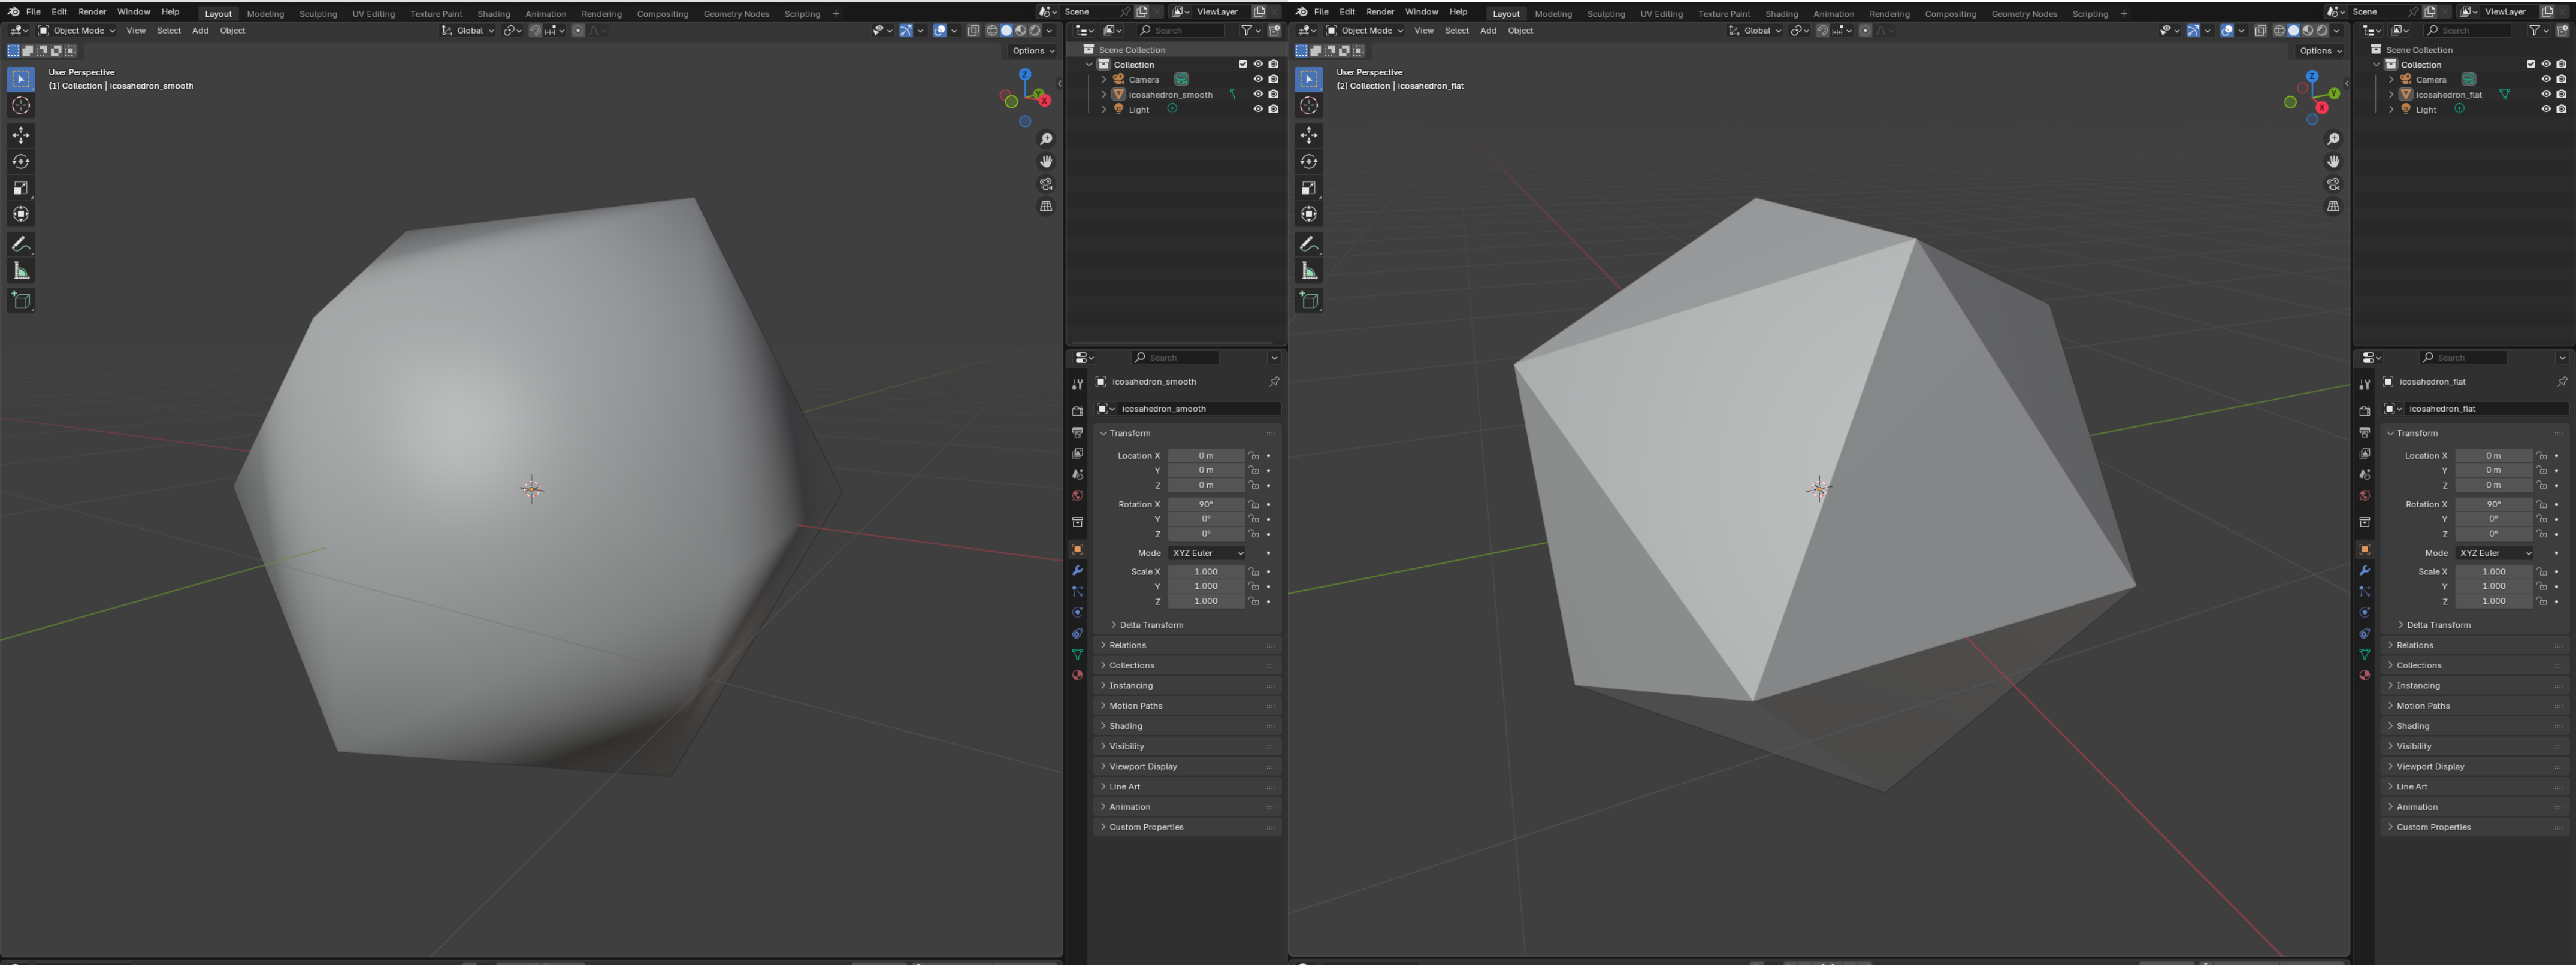
Normals - Icosahedron
Apply the normal helper functions to the icosahedron mesh so you can export both flat (per-face) and smooth (per-vertex) versions.
Use the shared write_polygon_mesh helper from lib.rs to export OBJ files in these examples.
Example: flat vs. smooth normals
Create examples/normals_icosahedron.rs:
use truck_meshes::{
    icosahedron,
    add_face_normals,
    add_vertex_normals,
    normalize_vertex_normals,
    write_polygon_mesh,
};

fn main() {
    // Flat shading: one normal per triangle
    let mut flat = icosahedron();
    add_face_normals(&mut flat);
    write_polygon_mesh(&flat, "output/icosahedron_flat.obj");

    // Smooth shading: blended normals per vertex
    let mut smooth = icosahedron();
    add_vertex_normals(&mut smooth);
    normalize_vertex_normals(&mut smooth); // keep them unit length
    write_polygon_mesh(&smooth, "output/icosahedron_smooth.obj");
}
Run it and inspect both OBJ files in a viewer to see the difference in shading.
Direct access to the vectors
If you only need the raw vectors (instead of mutating the mesh), call:
#![allow(unused)]
fn main() {
let mesh = icosahedron();
let face_normals = compute_face_normals(&mesh);     // len() == mesh.faces().len()
let vertex_normals = compute_vertex_normals(&mesh); // len() == mesh.positions().len()
}
Use the face normals when you want a crisp, faceted icosahedron; use the vertex normals when you want a softer, smooth-shaded look.
View it
in my opinion, the contrast is clearest in Blender.
Updated directory layout
truck_meshes/
├─ Cargo.toml
├─ src/
│  ├─ lib.rs
│  ├─ shapes/
│  │  ├─ mod.rs
│  │  ├─ triangle.rs
│  │  ├─ square.rs
│  │  ├─ tetrahedron.rs
│  │  ├─ hexahedron.rs
│  │  ├─ octahedron.rs
│  │  ├─ dodecahedron.rs
│  │  └─ icosahedron.rs
│  └─ utils/
│     ├─ mod.rs
│     └─ normal_helpers.rs
├─ examples/
│  ├─ triangle.rs
│  ├─ square.rs
│  ├─ tetrahedron.rs
│  ├─ hexahedron.rs
│  ├─ octahedron.rs
│  ├─ dodecahedron.rs
│  ├─ icosahedron.rs
│  └─ normals_icosahedron.rs
└─ output/          # exported OBJ files from examples
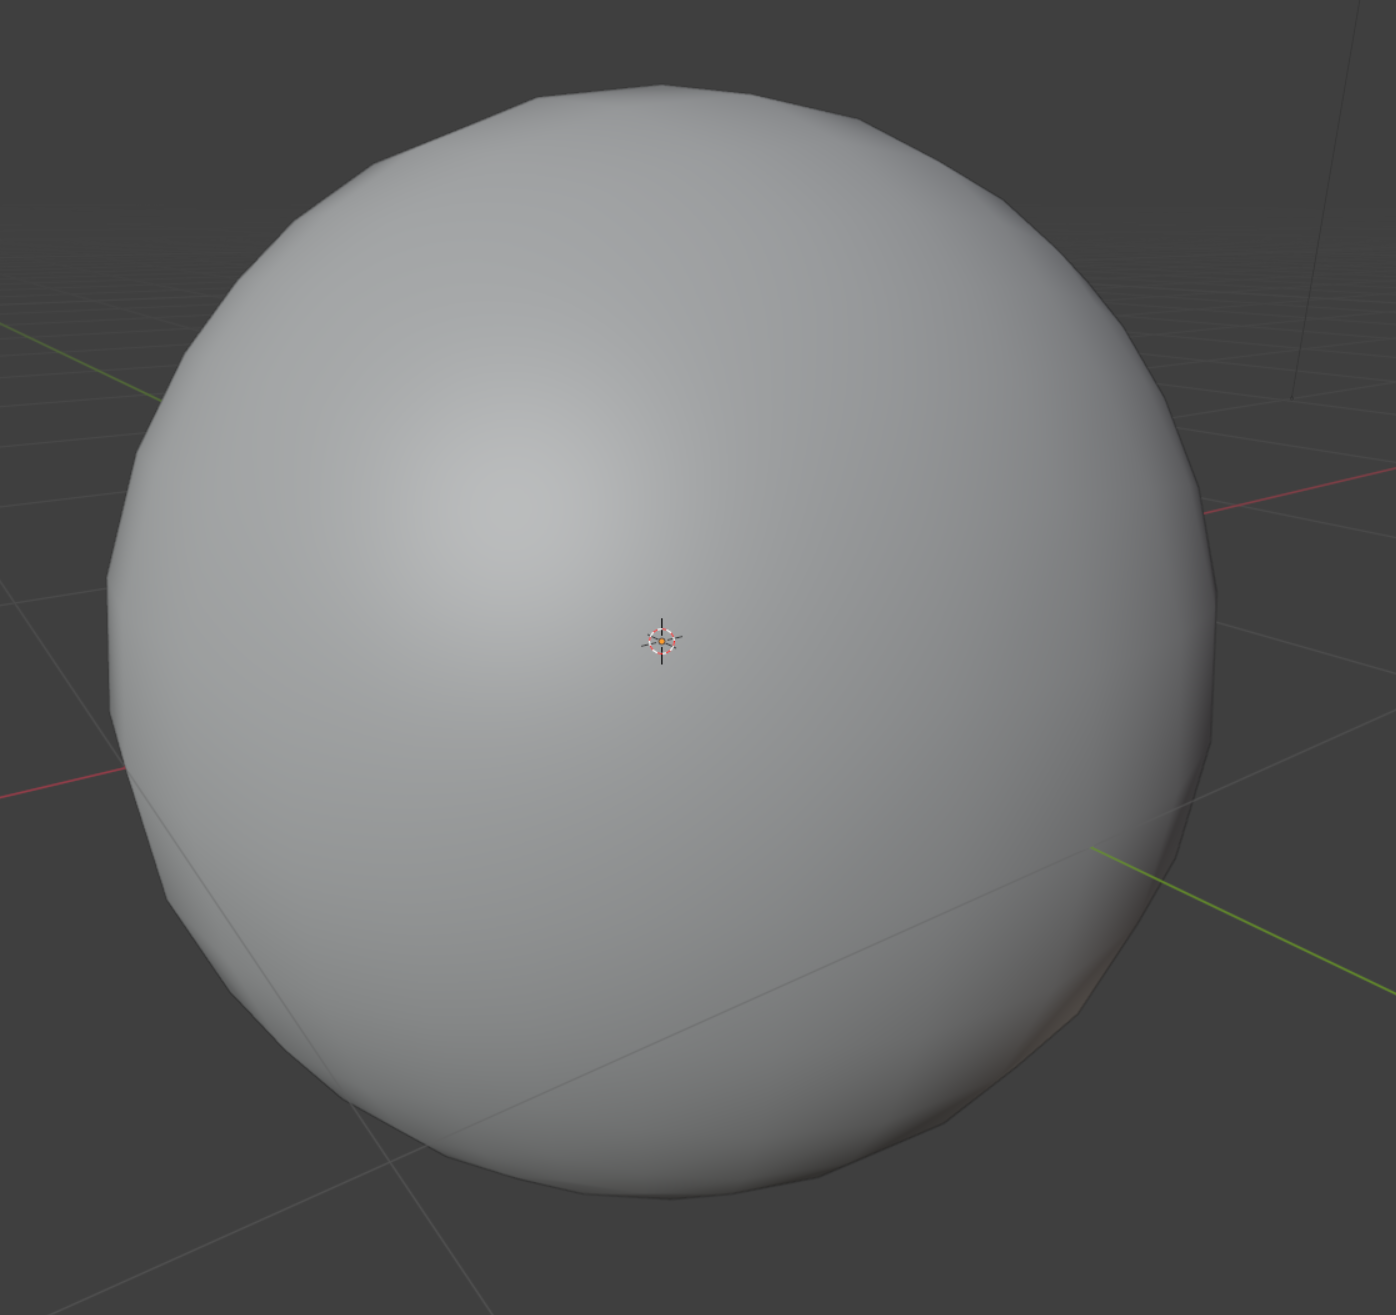
Normals - Sphere
Here we’ll inflate a cube into a sphere, assign per-vertex normals, and export an OBJ.
Full example: cube → sphere with normals
Reuse the shared write_polygon_mesh helper and hexahedron() shape from lib.rs to keep the sample lean:
Create file examples/normals_sphere.rs
use truck_meshalgo::prelude::*;
use truck_meshes::{hexahedron, write_polygon_mesh};

fn main() {

    //STEPS 1-6 GO HERE

}
Step 1: create hexahedron
#![allow(unused)]
fn main() {
    let hexa = hexahedron();
    // Center the unit cube from the library so projection covers all octants.
    let center = Vector3::new(0.5, 0.5, 0.5);
}
What it does
Pulls in the unit cube mesh from hexahedron() and recenters it so projecting to a sphere is symmetric in all directions.
Step 2: subdivide each face
#![allow(unused)]
fn main() {
    const DIVISION: usize = 8;

    // the positions of vertices
    let positions: Vec<Point3> = hexa
        .face_iter()
        .flat_map(|face| {
            // convert face vertex positions into Vec<Vector3>
            let v: Vec<Vector3> = face
                .iter()
                .map(|vertex| (hexa.positions()[vertex.pos] - center).to_vec())
                .collect();

            // create (i,j) grid 0..DIVISION
            (0..=DIVISION)
                .flat_map(move |i| (0..=DIVISION).map(move |j| (i, j)))
                .map(move |(i, j)| {
                    let s = i as f64 / DIVISION as f64;
                    let t = j as f64 / DIVISION as f64;

                    // bilinear interpolation inside the quad
                    v[0] * (1.0 - s) * (1.0 - t)
                        + v[1] * s * (1.0 - t)
                        + v[3] * (1.0 - s) * t
                        + v[2] * s * t
                })
        })
        // project onto the unit sphere
        .map(|vec| Point3::from_vec(vec.normalize()))
        .collect();
}
What it does
Samples each cube face on an (i,j) grid, bilinearly interpolates positions inside each quad, and normalizes every point to sit on the unit sphere.
Step 3: compute normals (just position → vector)
#![allow(unused)]
fn main() {
    let normals: Vec<Vector3> = positions.iter().copied().map(Point3::to_vec).collect();
}
What it does
Converts every sphere position into its outward unit vector; for a unit sphere, position and normal share the same direction.
Step 4: attributes
#![allow(unused)]
fn main() {
    let attrs = StandardAttributes {
        positions,
        normals,
        ..Default::default()
    };
}
What it does
Packs the generated positions and normals into StandardAttributes, leaving other attributes empty.
Step 5: face construction
#![allow(unused)]
fn main() {
    let faces: Faces = (0..6)
        .flat_map(|face_idx| {
            let base = face_idx * (DIVISION + 1) * (DIVISION + 1);

            // closure to map (i,j) → attribute indices
            let to_index = move |i: usize, j: usize| {
                let idx = base + (DIVISION + 1) * i + j;
                // (pos index, texcoord, normal index)
                (idx, None, Some(idx))
            };

            (0..DIVISION)
                .flat_map(move |i| (0..DIVISION).map(move |j| (i, j)))
                .map(move |(i, j)| {
                    [
                        to_index(i, j),
                        to_index(i + 1, j),
                        to_index(i + 1, j + 1),
                        to_index(i, j + 1),
                    ]
                })
        })
        .collect();
}
What it does
Builds quad faces for each subdivided patch, reusing the same index for both position and normal so the OBJ stays compact.
Step 6: build mesh and export
#![allow(unused)]
fn main() {
    let sphere = PolygonMesh::new(attrs, faces);
    write_polygon_mesh(&sphere, "output/sphere.obj");

    println!("Wrote output/sphere.obj");
}
}
What it does
Creates the final PolygonMesh from attributes and faces, writes it to output/sphere.obj, and logs the output path.
Final result
What to look for
- The OBJ contains per-vertex normals, so most viewers will render it smoothly.
- Because positions and normals share indices, the mesh stays compact; if you ever vary normals independently, keep the separate indices pattern shown above.
- Increase
DIVISIONfor a denser sphere; shading stays smooth because normals are normalized unit vectors.
Updated directory layout
truck_meshes/
├─ Cargo.toml
├─ src/
│  ├─ lib.rs
│  ├─ shapes/
│  │  ├─ mod.rs
│  │  ├─ triangle.rs
│  │  ├─ square.rs
│  │  ├─ tetrahedron.rs
│  │  ├─ hexahedron.rs
│  │  ├─ octahedron.rs
│  │  ├─ dodecahedron.rs
│  │  └─ icosahedron.rs
│  └─ utils/
│     ├─ mod.rs
│     └─ normal_helpers.rs
├─ examples/
│  ├─ triangle.rs
│  ├─ square.rs
│  ├─ tetrahedron.rs
│  ├─ hexahedron.rs
│  ├─ octahedron.rs
│  ├─ dodecahedron.rs
│  ├─ icosahedron.rs
│  ├─ normals_icosahedron.rs
│  └─ normals_sphere.rs
└─ output/          # exported OBJ files from examples
Mesh Filters
Use Truck’s mesh filters to clean, modify, and analyze meshes before rendering or export.
Create examples/normals_filter_sphere.rs
use truck_meshalgo::prelude::*;
use truck_meshes::write_polygon_mesh;

fn main() {

   // PLACE ALL EXAMPLES IN HERE

}
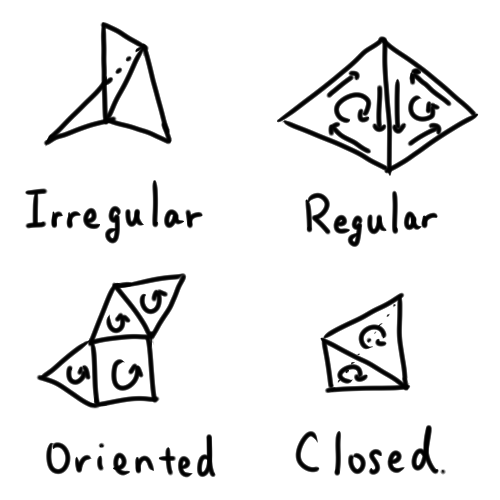
Topology conditions
Classify meshes (regular, oriented, closed, etc.):
Example (using sphere.obj from the last page):
#![allow(unused)]
fn main() {
let mut mesh: PolygonMesh =
   obj::read(include_bytes!(concat!(env!("CARGO_MANIFEST_DIR"), "/output/sphere.obj")).as_slice())
      .unwrap();
println!("default shell condition: {:?}", mesh.shell_condition());
}
explanation
Code breakdown
obj::read(...): loads the embeddedsphere.objinto aPolygonMesh.mesh.shell_condition(): inspects topology flags (irregular, oriented, closed).println!: prints the detected condition for quick inspection.
Conditions
- Irregular: an edge has 3+ faces.
- Regular: each edge has at most two faces.
- Oriented: no edge appears twice with the same direction.
- Closed: every edge appears exactly twice (watertight manifold).
Merge duplicate vertices
Remove seams created by duplicated coordinates:
#![allow(unused)]
fn main() {
// Merge duplicate vertices within 1e-3
mesh.put_together_same_attrs(1.0e-3);
println!("after merge: {:?}", mesh.shell_condition());
}
when to use
Importing OBJ/patch models, fixing seams, removing duplicate geometry.
Add normals
Faceted (per-face) normals:
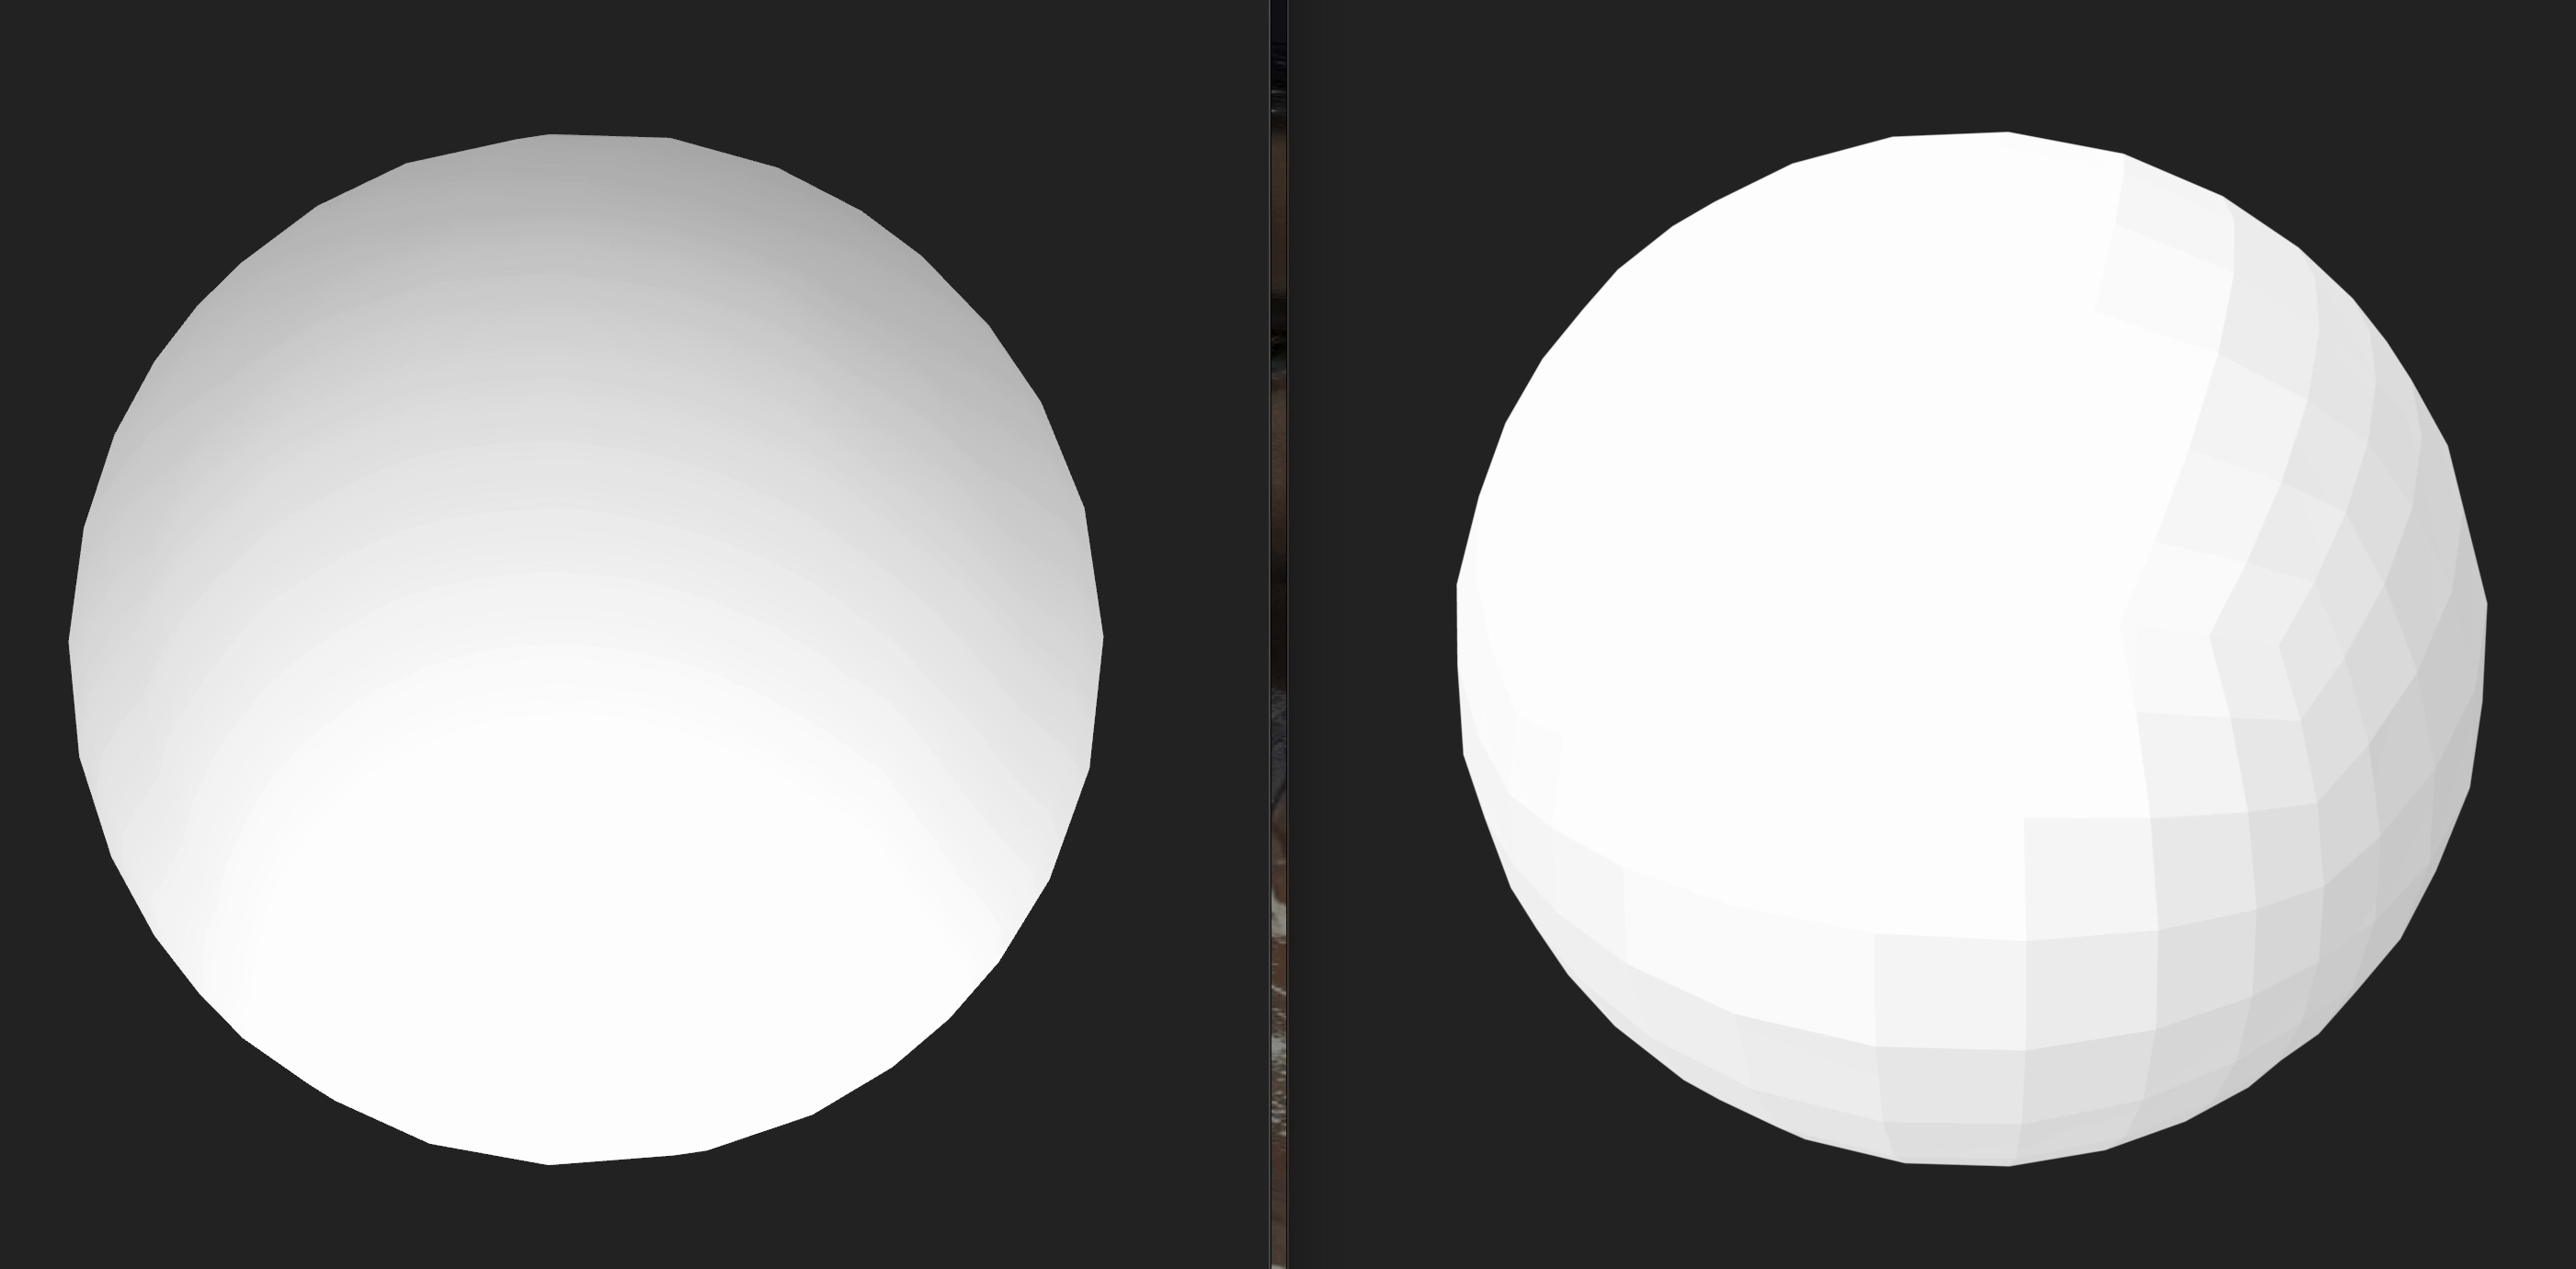
#![allow(unused)]
fn main() {
// Flat normals for a faceted look
mesh.add_naive_normals(true);
write_polygon_mesh(&mesh, "output/mirror-ball.obj");
}
when to use
Sharp mechanical parts, crisp reflections, debugging face orientation.
Smooth normals, normalize normals
- Blend across angles for softer shading:
- Keep direction, fix length:
#![allow(unused)]
fn main() {
// Smooth normals for softer shading
mesh.add_smooth_normals(1.0, true); // ~57° crease angle
mesh.normalize_normals(); // keep normal lengths unit after any edits/imports
write_polygon_mesh(&mesh, "output/mirror-ball-with-smooth-normal.obj");


}
when to use write_polygon_mesh
Spheres or organic shapes needing soft shading; lower the angle to preserve creases.
when to use normalize_normals
After editing/importing normals to ensure they remain unit length without recomputing direction.
Other cleanup passes
Truck’s filter module (truck_meshalgo::filters) also includes:
OptimizingFilter
- Drops degenerate faces (zero-area or repeated-vertex polygons).
- Removes unused attributes left over after edits or imports.
- Unifies shared vertices more aggressively than simple epsilon-based merging.
Useful after imports, procedural generation, or tessellation passes to reduce mesh size and fix broken topology.
StructuringFilter
- Reorganizes vertex attributes for tighter packing.
- Reorders faces and indices to improve cache-coherent traversal.
- Produces meshes that render faster and export more cleanly (OBJ/GLTF).
Useful before export or before sending the mesh into a real-time renderer.
Subdivision and refinement
- Use Subdivision filters to add geometric detail to coarse meshes.
(For example: smoothing a low-poly model before export or rendering.) - Subdivision creates refined faces and smoothed vertex flow, improving shading quality.
- Always apply subdivision after cleanup (merging duplicates, removing degenerates, orienting) so the new mesh inherits clean topology and correct normals.
Useful for smooth surfaces, rounded objects, or preparing assets for high-fidelity viewers.
Save and run
Use the existing write_polygon_mesh helper to export OBJ files, then:
cargo run
Inspect the results in an OBJ viewer (Preview, Blender, ParaView) to verify topology and normals.
Full example: filter a sphere OBJ (`examples/normals_filter_sphere.rs`)
use truck_meshalgo::prelude::*;
use truck_meshes::write_polygon_mesh;

fn main() {
    // Load the generated sphere OBJ from output/ embedded at compile time
    let mut mesh: PolygonMesh =
        obj::read(include_bytes!(concat!(env!("CARGO_MANIFEST_DIR"), "/output/sphere.obj")).as_slice())
            .unwrap();
    println!("default shell condition: {:?}", mesh.shell_condition());

    // Merge duplicate vertices within 1e-3
    mesh.put_together_same_attrs(1.0e-3);
    println!("after merge: {:?}", mesh.shell_condition());

    // Flat normals for a faceted look
    mesh.add_naive_normals(true);
    write_polygon_mesh(&mesh, "output/mirror-ball.obj");

    // Smooth normals for softer shading
    mesh.add_smooth_normals(1.0, true); // ~57° crease angle
    mesh.normalize_normals(); // keep normal lengths unit after any edits/imports
    write_polygon_mesh(&mesh, "output/mirror-ball-with-smooth-normal.obj");
}
Updated directory layout
truck_meshes/
├─ Cargo.toml
├─ src/
│  ├─ lib.rs
│  ├─ shapes/
│  │  ├─ mod.rs
│  │  ├─ triangle.rs
│  │  ├─ square.rs
│  │  ├─ tetrahedron.rs
│  │  ├─ hexahedron.rs
│  │  ├─ octahedron.rs
│  │  ├─ dodecahedron.rs
│  │  └─ icosahedron.rs
│  └─ utils/
│     ├─ mod.rs
│     └─ normal_helpers.rs
├─ examples/
│  ├─ triangle.rs
│  ├─ square.rs
│  ├─ tetrahedron.rs
│  ├─ hexahedron.rs
│  ├─ octahedron.rs
│  ├─ dodecahedron.rs
│  ├─ icosahedron.rs
│  ├─ normals_icosahedron.rs
│  ├─ normals_sphere.rs
│  └─ normals_filter_sphere.rs
└─ output/          # exported OBJ files from examples
Modeling
Shift from polygon meshes to precise boundary representations (B-reps).
Although both meshes and B-reps use vertices, edges, and faces, they describe geometry in completely different ways.
Meshes approximate shape using flat pieces:
- Vertices: points in 3D space
- Edges: straight line segments
- Faces: flat polygons (usually triangles)
A mesh sphere, cylinder, or fillet is always a faceted approximation (represented using many small flat faces).
B-reps store the exact analytic geometry of a solid:
- Vertices: points in 3D space
- Edges: mathematical curves (lines, arcs, splines, NURBS)
- Faces: analytic surfaces (planes, cylinders, spheres, NURBS patches)
- Solids: closed collections of faces forming true watertight bodies
With B-reps, a circle is a true circle, a sphere is a perfect sphere, and fillets/blends are smooth by definition—not approximated by polygons.
This is the representation used by major CAD kernels:
Parasolid (SolidWorks, Onshape, NX), ACIS/ShapeManager (Inventor), CGM (CATIA), and others.
Why use B-reps?
B-reps (Boundary Representations) are used in CAD because they preserve the exact geometry of a solid.
Unlike polygon meshes—which approximate surfaces with many small flat facets—B-reps retain the true analytic curves and surfaces that define engineered parts.
Advantages of B-reps:
-
Exact mathematical curves and surfaces
Lines, arcs, circles, splines, NURBS, cylinders, spheres—no approximation. -
Dimension-driven modeling
Features can be defined by precise measurements (radius, thickness, angle, sweep distance). -
Smooth surfaces by definition
Fillets, blends, and revolved surfaces are perfectly smooth, not faceted. -
Export to neutral CAD formats (STEP, IGES)
These formats require analytic geometry; meshes cannot represent them accurately. -
Clean conversion to meshes for rendering or simulation
Tessellated meshes inherit exact topology from the B-rep, producing cleaner normals and fewer artifacts.
Truck includes a complete B-rep system that you will use throughout Chapter 3.
Project layout for Chapter 3
Keep your Chapter 2 mesh crate as-is, and add a sibling B-rep crate. Target workspace layout:
truck-workspace/
├─ truck_meshes/   # Chapter 2 mesh crate (unchanged)
└─ truck_brep/     # Chapter 3 B-rep crate you’ll create below
Add a sibling crate dedicated to B-rep modeling
- Create a sibling crate named
truck_brepin the parent directory that already containstruck_meshes:
# run from the parent dir that already has truck_meshes/
cargo new --lib truck_brep
mkdir -p truck_brep/examples truck_brep/output
src/lib.rsholds the shared OBJ/STEP helpers and exports the per-shape modules.- Per-shape modules (
cube.rs,torus.rs,cylinder.rs,bottle.rs) sit directly insrc/next tolib.rs. examples/holds runnable samples that call intotruck_brep::*.output/collects OBJ/STEP exports so they do not clutter source control.
truck_brep/
├─ Cargo.toml      # add truck-modeling, truck-meshalgo, truck-stepio deps
├─ src/
│  ├─ lib.rs       # helpers + re-exports
│  └─              # add torus.rs, cylinder.rs, bottle.rs as you go
│
├─ examples/
│  └─              # calls truck_brep::cube(), etc.
└─ output/         # generated OBJ/STEP files
Update truck_brep/Cargo.toml
Add the Truck crates (match the versions you used in truck_meshes so everything stays in sync):
[dependencies]
# modeling API
truck-modeling = "0.6.0"
# meshing modeled shape
truck-meshalgo = "0.4.0"
# output STEP
truck-stepio = "0.3.0"
# topology helpers (compression)
truck-topology = "0.6.0"
Tessellate B-reps to Meshes
To render or export, B-rep solids must be tessellated into polygon meshes.
Truck’s meshing layer truck-meshalgo provides core traits for this process:
-
MeshableShape
Converts an analytic B-rep shape into a polygon mesh using default tessellation settings. -
RobustMeshableShape
A more defensive version ofMeshableShapethat adds numerical tolerances and safety checks for difficult or complex shapes (CSG trees, tiny edges, near-degenerate surfaces). -
MeshedShape
Represents the final tessellated result — aPolygonMeshpaired with the metadata used during tessellation.
Truck also includes a tessellation demo, examples/tessellate-shape, which converts analytic shapes and full CSG trees into OBJ meshes.
Typical workflow:
- Build or finish the analytic (B-rep) solid.
- Tessellate it into a polygon mesh.
- Run mesh filters (normals, smoothing, optimization).
- Export or view the cleaned mesh in your preferred viewer.
This ensures the final mesh accurately reflects the B-rep geometry while remaining efficient for rendering.
What you will learn in Chapter 3
- 3.1 Cube: build an exact cube; see how B-rep solids are assembled.
- 3.2 Torus: work with rotational sweeps to create curved surfaces.
- 3.3 Cylinder: combine rotational, planar, and translational sweeps for a solid.
- 3.4 Higher Level Modeling: model with NURBS; build solids from exact curved surfaces instead of approximations.
By the end of this chapter, you’ll understand how Truck represents CAD-quality shapes—far more precise than meshes.
Reference: full truck_brep snapshot
Directory tree:
truck_brep/
├─ Cargo.toml      # add truck-modeling, truck-meshalgo, truck-stepio deps
├─ src/
│  ├─ lib.rs       # helpers + re-exports
│  └─              # add torus.rs, cylinder.rs, bottle.rs as you go
│
├─ examples/
│  └─              # calls truck_brep::cube(), etc.
└─ output/         # generated OBJ/STEP files
Cargo.toml dependencies:
[dependencies]
# modeling API
truck-modeling = "0.6.0"
# meshing modeled shape
truck-meshalgo = "0.4.0"
# output STEP
truck-stepio = "0.3.0"
# topology helpers (compression)
truck-topology = "0.6.0"
B-rep Helper Functions
Centralize exports and reusable OBJ/STEP helpers in your truck_brep crate so shape files only worry about geometry.
src/lib.rs
Imports and module wiring
#![allow(unused)]
fn main() {
use std::{fs, io, path::Path};

use truck_meshalgo::prelude::*;
use truck_modeling::*;
use truck_stepio::out::{CompleteStepDisplay, StepModel};
use truck_topology::compress::{CompressedShell, CompressedSolid};
}
What this does
Brings in filesystem/IO utilities plus the Truck modeling, meshing, STEP output, and compression helpers that the rest of the files use.StepCompress trait
#![allow(unused)]
fn main() {
/// Helper to compress modeling shapes into STEP-compatible data.
pub trait StepCompress {
    type Compressed;
    fn compress_for_step(&self) -> Self::Compressed;
}
}
What this does
Defines a small adapter trait so both `Shell` and `Solid` expose a common `compress_for_step` method, hiding their different compressed types.StepCompress for Shell
#![allow(unused)]
fn main() {
impl StepCompress for Shell {
    type Compressed = CompressedShell<Point3, Curve, Surface>;
    fn compress_for_step(&self) -> Self::Compressed {
        self.compress()
    }
}
}
What this does
Implements `StepCompress` for shells by delegating to the kernel’s built-in `compress`, returning the STEP-ready shell representation.StepCompress for Solid
#![allow(unused)]
fn main() {
impl StepCompress for Solid {
    type Compressed = CompressedSolid<Point3, Curve, Surface>;
    fn compress_for_step(&self) -> Self::Compressed {
        self.compress()
    }
}
}
What this does
Implements `StepCompress` for solids, again forwarding to `compress` so solids can be exported with the same helper API.save_step helper
#![allow(unused)]
fn main() {
/// Export any B-rep (Solid or Shell) to STEP.
pub fn save_step<T, P>(brep: &T, path: P) -> io::Result<()>
where
    T: StepCompress,
    for<'a> StepModel<'a, Point3, Curve, Surface>: From<&'a T::Compressed>,
    P: AsRef<Path>,
{
    let path = path.as_ref();
    if let Some(parent) = path.parent() {
        fs::create_dir_all(parent)?;
    }
    let compressed = brep.compress_for_step();
    let display = CompleteStepDisplay::new(StepModel::from(&compressed), Default::default());
    fs::write(path, display.to_string())
}
}
What this does
Creates parent folders if needed, compresses the shape, wraps it in a STEP display with defaults, and writes the STEP text to disk.save_obj helper
#![allow(unused)]
fn main() {
/// Triangulate any B-rep (Solid or Shell) and write an OBJ mesh.
pub fn save_obj(shape: &impl MeshableShape, path: impl AsRef<Path>) -> io::Result<()> {
    let mesh = shape.triangulation(0.01).to_polygon();
    let path = path.as_ref();
    if let Some(parent) = path.parent() {
        fs::create_dir_all(parent)?;
    }
    let mut obj = fs::File::create(path)?;
    obj::write(&mesh, &mut obj).map_err(|err| io::Error::new(io::ErrorKind::Other, err))
}
}
What this does
Tessellates the shape with a 0.01 chord tolerance, ensures the output folder exists, then writes the resulting polygon mesh as an OBJ file.Target directory tree
truck_brep/
├─ Cargo.toml      # add truck-modeling, truck-meshalgo, truck-stepio deps
├─ src/
│  ├─ lib.rs       # helpers + re-exports
│  ├─ ...          # shape modules (add torus.rs, cylinder.rs, bottle.rs, etc.)
├─ examples/
│  └─ ...          # one small example per shape
└─ output/         # generated OBJ/STEP files (created at runtime)
Complete src/lib.rs
#![allow(unused)]
fn main() {
use std::{fs, io, path::Path};

use truck_meshalgo::prelude::*;
use truck_modeling::*;
use truck_stepio::out::{CompleteStepDisplay, StepModel};
use truck_topology::compress::{CompressedShell, CompressedSolid};

/// Helper to compress modeling shapes into STEP-compatible data.
pub trait StepCompress {
    type Compressed;
    fn compress_for_step(&self) -> Self::Compressed;
}

impl StepCompress for Shell {
    type Compressed = CompressedShell<Point3, Curve, Surface>;
    fn compress_for_step(&self) -> Self::Compressed { self.compress() }
}

impl StepCompress for Solid {
    type Compressed = CompressedSolid<Point3, Curve, Surface>;
    fn compress_for_step(&self) -> Self::Compressed { self.compress() }
}

/// Export any B-rep (Solid or Shell) to STEP.
pub fn save_step<T, P>(brep: &T, path: P) -> io::Result<()>
where
    T: StepCompress,
    for<'a> StepModel<'a, Point3, Curve, Surface>: From<&'a T::Compressed>,
    P: AsRef<Path>,
{
    let path = path.as_ref();
    if let Some(parent) = path.parent() {
        fs::create_dir_all(parent)?;
    }
    let compressed = brep.compress_for_step();
    let display = CompleteStepDisplay::new(
        StepModel::from(&compressed),
        Default::default(),
    );
    fs::write(path, display.to_string())
}

/// Triangulate any B-rep (Solid or Shell) and write an OBJ mesh.
pub fn save_obj(shape: &impl MeshableShape, path: impl AsRef<Path>) -> io::Result<()> {
    let mesh = shape.triangulation(0.01).to_polygon();
    let path = path.as_ref();
    if let Some(parent) = path.parent() {
        fs::create_dir_all(parent)?;
    }
    let mut obj = fs::File::create(path)?;
    obj::write(&mesh, &mut obj).map_err(|err| io::Error::new(io::ErrorKind::Other, err))
}
}
Cube
Model a precise B-rep cube in Truck
B-rep Building Blocks
- Vertex → a point in 3D space.
- Edge → a curve connecting two vertices (line, arc, spline, etc.).
- Wire → an ordered loop of edges; closed wires bound faces.
- Face → a surface patch bounded by one outer wire (plus optional inner wires for holes).
- Shell → a connected set of stitched faces.
- Solid → a closed, watertight shell enclosing a volume.
Build a cube with tsweep
What tsweep does
tsweep takes a geometric element and pushes it in a straight line to create the next-level element:
- sweep a vertex → you get an edge
- sweep an edge → you get a face
- sweep a face → you get a solid
A cube is built by sweeping three times along the X, Y, and Z directions.
src/cube.rs
#![allow(unused)]
fn main() {
use truck_modeling::*;
}
#![allow(unused)]
fn main() {
pub fn cube() -> Solid {
  // STEPS 1-4 GO HERE

}
}
1. Place the first vertex at (-1, 0, -1).
#![allow(unused)]
fn main() {
  let vertex: Vertex = builder::vertex(Point3::new(-1.0, 0.0, -1.0));
}
what this code does
builder::vertex lifts a raw point into a B-rep Vertex, giving us a manipulable geometric anchor for the sweeps that follow.
visual
            y
            │
            │
(x=-1)  ●   │
 start    \ │
  here     \│
            └──── x
           /
          z

Point = (-1, 0, -1)
2. Sweep 2 units along +Z → edge.
#![allow(unused)]
fn main() {
  let edge:   Edge   = builder::tsweep(&vertex, 2.0 * Vector3::unit_z());
}
what this code does
builder::tsweep clones the vertex and moves the copy by 2.0 * +Z—since +Z is the unit vector (0, 0, 1), the translation is (0, 0, 2) (two units up the Z axis).
It then returns the Edge spanning between the original point and the shifted one.
visual
Before sweep:

   ●  (vertex)

After sweeping along +Z:

   ●──────────●
    (start)   (end)

This is the new Edge.
3. Sweep edge 2 units along +X → rectangular face.
#![allow(unused)]
fn main() {
  let face:   Face   = builder::tsweep(&edge,   2.0 * Vector3::unit_x());
}
what this code does
The edge is duplicated and shifted +X by 2.0; tsweep stitches the original and shifted edges into a ruled surface, yielding a rectangular Face.
visual
Sweep direction +X:

   ●──────────●
   |          |
   |          |
   |          |
   │          │
   ●──────────●

That forms a rectangular Face.
4. Sweep face 2 units along +Y → solid cube.
#![allow(unused)]
fn main() {
  builder::tsweep(&face, 2.0 * Vector3::unit_y())
}
what this code does
Sweeps the rectangular face upward by 2.0 along +Y, then caps the start and end to form a closed shell; because the face is planar and bounded, the result is a watertight solid cube.
visual
Sweeping the rectangular face upward (+Y) forms the cube volume:

               ●─────────●
              /|        /|
             / |       / |
            ●─────────●  |
            │  |      │  |
            │  ●──────┼──●
            │ /       │ /
            ●─────────●
                (full solid)

Direction of final sweep: +Y
Update src/lib.rs to expose cube
#![allow(unused)]
fn main() {
pub mod cube;
pub use cube::cube;
}
Example entry point
examples/cube.rs calls into the library and uses the helper wrappers that create output folders automatically:
fn main() {
    let cube = truck_brep::cube();
    truck_brep::save_obj(&cube, "output/cube.obj").unwrap();
    truck_brep::save_step(&cube, "output/cube.step").unwrap();
}
This keeps the binary minimal and lets other sections reuse the same helpers.
Directory tree
truck_brep/
├─ src/
│  ├─ lib.rs      # helpers + re-exports
│  └─ cube.rs     # cube()
├─ examples/
│  └─ cube.rs     # calls into lib
└─ output/        # generated OBJ/STEP (created at runtime)
Complete code
src/lib.rs
#![allow(unused)]
fn main() {
use std::{fs, io, path::Path};

use truck_meshalgo::prelude::*;
use truck_modeling::*;
use truck_stepio::out::{CompleteStepDisplay, StepModel};
use truck_topology::compress::{CompressedShell, CompressedSolid};

pub mod cube;
pub use cube::cube;

/// Helper to compress modeling shapes into STEP-compatible data.
pub trait StepCompress {
    type Compressed;
    fn compress_for_step(&self) -> Self::Compressed;
}

impl StepCompress for Shell {
    type Compressed = CompressedShell<Point3, Curve, Surface>;
    fn compress_for_step(&self) -> Self::Compressed { self.compress() }
}

impl StepCompress for Solid {
    type Compressed = CompressedSolid<Point3, Curve, Surface>;
    fn compress_for_step(&self) -> Self::Compressed { self.compress() }
}

/// Export any B-rep (Solid or Shell) to STEP.
pub fn save_step<T, P>(brep: &T, path: P) -> io::Result<()>
where
    T: StepCompress,
    for<'a> StepModel<'a, Point3, Curve, Surface>: From<&'a T::Compressed>,
    P: AsRef<Path>,
{
    let path = path.as_ref();
    if let Some(parent) = path.parent() {
        fs::create_dir_all(parent)?;
    }
    let compressed = brep.compress_for_step();
    let display = CompleteStepDisplay::new(
        StepModel::from(&compressed),
        Default::default(),
    );
    fs::write(path, display.to_string())
}

/// Triangulate any B-rep (Solid or Shell) and write an OBJ mesh.
pub fn save_obj(shape: &impl MeshableShape, path: impl AsRef<Path>) -> io::Result<()> {
    let mesh = shape.triangulation(0.01).to_polygon();
    let path = path.as_ref();
    if let Some(parent) = path.parent() {
        fs::create_dir_all(parent)?;
    }
    let mut obj = fs::File::create(path)?;
    obj::write(&mesh, &mut obj).map_err(|err| io::Error::new(io::ErrorKind::Other, err))
}

}
src/cube.rs
#![allow(unused)]
fn main() {
use truck_modeling::*;

pub fn cube() -> Solid {
    let vertex: Vertex = builder::vertex(Point3::new(-1.0, 0.0, -1.0));
    let edge: Edge = builder::tsweep(&vertex, 2.0 * Vector3::unit_z());
    let face: Face = builder::tsweep(&edge, 2.0 * Vector3::unit_x());
    builder::tsweep(&face, 2.0 * Vector3::unit_y())
}
}
examples/cube.rs
fn main() {
    let cube = truck_brep::cube();
    truck_brep::save_obj(&cube, "output/cube.obj").unwrap();
    truck_brep::save_step(&cube, "output/cube.step").unwrap();
}
Torus
Build a torus (donut) with rotational sweeps, keeping the geometry and exports in the library just like the cube section. For the cylinder example, see modeling_cylinder.md.
Build a torus with rsweep
What rsweep does
rsweep spins a geometric element around an axis to create the next-level element:
- spin a vertex → you get a wire (circle)
- spin a wire → you get a shell
A torus is built by two rotations: one to form the circle, another to spin that circle into the donut.
src/torus.rs
#![allow(unused)]
fn main() {
use truck_modeling::*;
}
#![allow(unused)]
fn main() {
pub fn torus() -> Solid {
  // STEPS 1-3 GO HERE

}
}
1. Place a vertex at (0, 0, 1).
#![allow(unused)]
fn main() {
  let vertex: Vertex = builder::vertex(Point3::new(0.0, 0.0, 1.0));
}
what this code does
Creates a B-rep vertex at (0, 0, 1) to act as the seed point for the rotational sweeps.
visual
        y
        │
        │
   ●    │   (start at z = 1)
        │
        └──── x
       /
      z
2. Spin the vertex around +X to form a circular wire.
#![allow(unused)]
fn main() {
  let circle: Wire = builder::rsweep(
      &vertex,
      Point3::new(0.0, 0.5, 1.0), // point on rotation axis
      Vector3::unit_x(),         // axis direction
      Rad(7.0),                  // > 2π ensures closure
  );
}
what this code does
rsweep clones the vertex and spins it around the +X axis through (0, 0.5, 1.0); the start and end positions connect into a circular wire.
visual
Axis: +X through (0, 0.5, 1.0)

   (spins around X)
       ^
       |
   ●---+---●  (wire)
       |
     axis
3. Spin the circle around +Y to form the torus shell.
#![allow(unused)]
fn main() {
  builder::rsweep(&circle, Point3::origin(), Vector3::unit_y(), Rad(7.0))
}
what this code does
Rotates the circle about the Y axis at the origin; the swept surface forms the torus shell.
visual
Second rotation around +Y wraps the circle into a torus:

      ●─────●
     /       \
    ●         ●
     \       /
      ●─────●
Update src/lib.rs to expose torus
#![allow(unused)]
fn main() {
pub mod torus;
pub use torus::torus;
}
Example entry point
examples/torus.rs stays tiny and calls into the library:
fn main() {
    let torus = truck_brep::torus();
    truck_brep::save_obj(&torus, "output/torus.obj").unwrap();
    truck_brep::save_step(&torus, "output/torus.step").unwrap();
}
Directory tree (for this section)
truck_brep/
├─ src/
│  ├─ lib.rs      # helpers + re-exports
│  ├─ cube.rs     # from previous section (optional)
│  └─ torus.rs    # torus()
├─ examples/
│  ├─ cube.rs
│  └─ torus.rs
└─ output/        # created at runtime
Complete code
src/lib.rs
#![allow(unused)]
fn main() {
use std::{fs, io, path::Path};

use truck_meshalgo::prelude::*;
use truck_modeling::*;
use truck_stepio::out::{CompleteStepDisplay, StepModel};
use truck_topology::compress::{CompressedShell, CompressedSolid};

pub mod cube;
pub use cube::cube;

pub mod torus;
pub use torus::torus;

/// Helper to compress modeling shapes into STEP-compatible data.
pub trait StepCompress {
    type Compressed;
    fn compress_for_step(&self) -> Self::Compressed;
}

impl StepCompress for Shell {
    type Compressed = CompressedShell<Point3, Curve, Surface>;
    fn compress_for_step(&self) -> Self::Compressed { self.compress() }
}

impl StepCompress for Solid {
    type Compressed = CompressedSolid<Point3, Curve, Surface>;
    fn compress_for_step(&self) -> Self::Compressed { self.compress() }
}

/// Export any B-rep (Solid or Shell) to STEP.
pub fn save_step<T, P>(brep: &T, path: P) -> io::Result<()>
where
    T: StepCompress,
    for<'a> StepModel<'a, Point3, Curve, Surface>: From<&'a T::Compressed>,
    P: AsRef<Path>,
{
    let path = path.as_ref();
    if let Some(parent) = path.parent() {
        fs::create_dir_all(parent)?;
    }
    let compressed = brep.compress_for_step();
    let display = CompleteStepDisplay::new(
        StepModel::from(&compressed),
        Default::default(),
    );
    fs::write(path, display.to_string())
}

/// Triangulate any B-rep (Solid or Shell) and write an OBJ mesh.
pub fn save_obj(shape: &impl MeshableShape, path: impl AsRef<Path>) -> io::Result<()> {
    let mesh = shape.triangulation(0.01).to_polygon();
    let path = path.as_ref();
    if let Some(parent) = path.parent() {
        fs::create_dir_all(parent)?;
    }
    let mut obj = fs::File::create(path)?;
    obj::write(&mesh, &mut obj).map_err(|err| io::Error::new(io::ErrorKind::Other, err))
}

}
src/torus.rs
#![allow(unused)]
fn main() {
use truck_modeling::*;

pub fn torus() -> Shell {
    let vertex: Vertex = builder::vertex(Point3::new(0.0, 0.0, 1.0));
    let circle: Wire = builder::rsweep(
        &vertex,
        Point3::new(0.0, 0.5, 1.0), // point on rotation axis
        Vector3::unit_x(),         // axis direction
        Rad(7.0),                  // > 2π ensures closure
    );
    builder::rsweep(&circle, Point3::origin(), Vector3::unit_y(), Rad(7.0))
}
}
examples/torus.rs
fn main() {
    let torus = truck_brep::torus();
    truck_brep::save_obj(&torus, "output/torus.obj").unwrap();
    truck_brep::save_step_any(&torus, "output/torus.step").unwrap();
}
Cylinder
Build a cylinder with rsweep, try_attach_plane, and tsweep
What happens at each step
- Rotational sweep (`rsweep`): spin a vertex to make a circular wire.
- Plane attachment: cap the wire into a disk with
try_attach_plane. - Translational sweep (`tsweep`): extrude the disk to form the solid.
src/cylinder.rs
#![allow(unused)]
fn main() {
use truck_modeling::*;
}
#![allow(unused)]
fn main() {
pub fn cylinder() -> Solid {
  // STEPS 1-4 GO HERE

}
}
1. Place a vertex on the base circle at (0, 0, -1).
#![allow(unused)]
fn main() {
  let vertex: Vertex = builder::vertex(Point3::new(0.0, 0.0, -1.0));
}
visual
          y
          │
          │
   ●      │   (start at z = -1)
          │
          └──── x
         /
        z
2. Spin the vertex around +Z to form a circular wire.
#![allow(unused)]
fn main() {
  let circle: Wire = builder::rsweep(
      &vertex,
      Point3::new(0.0, 1.0, -1.0), // point on rotation axis
      Vector3::unit_z(),          // axis direction
      Rad(7.0),                   // > 2π ensures closure
  );
}
visual
Axis: +Z through (0, 1, -1)

     ●---●---●   (circle in XY plane at z = -1)
      \  |  /
       \ | /
         +
        axis
3. Cap the wire into a planar disk.
#![allow(unused)]
fn main() {
  let disk: Face =
      builder::try_attach_plane(&vec![circle]).expect("cannot attach plane");
}
visual
The circular wire is filled to a disk (face) if the wire is closed and planar.

     +------+
    /        \
   |    ●     |
    \        /
     +------+
4. Extrude the disk 2 units along +Z to make the solid.
#![allow(unused)]
fn main() {
  builder::tsweep(&disk, 2.0 * Vector3::unit_z())
}
visual
Sweeping the disk upward (+Z) forms the cylinder volume:

     ●───────●
    /|       /|
   ●───────●  |
   | |      | |
   | ●──────|-●
   |/       |/
   ●───────●
Update src/lib.rs to expose cylinder
#![allow(unused)]
fn main() {
pub mod cylinder;
pub use cylinder::cylinder;
}
Keep helpers in lib.rs and cylinder in src/cylinder.rs.
Example entry point
examples/cylinder.rs stays tiny and calls into the library:
fn main() {
    let cylinder = truck_brep::cylinder();
    truck_brep::save_obj(&cylinder, "output/cylinder.obj").unwrap();
    truck_brep::save_step(&cylinder, "output/cylinder.step").unwrap();
}
Directory tree (for this section)
truck_brep/
├─ src/
│  ├─ lib.rs      # helpers + re-exports
│  ├─ cube.rs
│  ├─ torus.rs
│  └─ cylinder.rs # this section
├─ examples/
│  ├─ cube.rs
│  ├─ torus.rs
│  └─ cylinder.rs
└─ output/        # created at runtime
Complete code
src/lib.rs
#![allow(unused)]
fn main() {
use std::{fs, io, path::Path};

use truck_meshalgo::prelude::*;
use truck_modeling::*;
use truck_stepio::out::{CompleteStepDisplay, StepModel};
use truck_topology::compress::{CompressedShell, CompressedSolid};

pub mod cube;
pub use cube::cube;

pub mod torus;
pub use torus::torus;

pub mod cylinder;
pub use cylinder::cylinder;

/// Helper to compress modeling shapes into STEP-compatible data.
pub trait StepCompress {
    type Compressed;
    fn compress_for_step(&self) -> Self::Compressed;
}

impl StepCompress for Shell {
    type Compressed = CompressedShell<Point3, Curve, Surface>;
    fn compress_for_step(&self) -> Self::Compressed { self.compress() }
}

impl StepCompress for Solid {
    type Compressed = CompressedSolid<Point3, Curve, Surface>;
    fn compress_for_step(&self) -> Self::Compressed { self.compress() }
}

/// Export any B-rep (Solid or Shell) to STEP.
pub fn save_step<T, P>(brep: &T, path: P) -> io::Result<()>
where
    T: StepCompress,
    for<'a> StepModel<'a, Point3, Curve, Surface>: From<&'a T::Compressed>,
    P: AsRef<Path>,
{
    let path = path.as_ref();
    if let Some(parent) = path.parent() {
        fs::create_dir_all(parent)?;
    }
    let compressed = brep.compress_for_step();
    let display = CompleteStepDisplay::new(
        StepModel::from(&compressed),
        Default::default(),
    );
    fs::write(path, display.to_string())
}

/// Triangulate any B-rep (Solid or Shell) and write an OBJ mesh.
pub fn save_obj(shape: &impl MeshableShape, path: impl AsRef<Path>) -> io::Result<()> {
    let mesh = shape.triangulation(0.01).to_polygon();
    let path = path.as_ref();
    if let Some(parent) = path.parent() {
        fs::create_dir_all(parent)?;
    }
    let mut obj = fs::File::create(path)?;
    obj::write(&mesh, &mut obj).map_err(|err| io::Error::new(io::ErrorKind::Other, err))
}
}
src/cylinder.rs
#![allow(unused)]
fn main() {
use truck_modeling::*;

pub fn cylinder() -> Solid {
    let vertex: Vertex = builder::vertex(Point3::new(0.0, 0.0, -1.0));
    let circle: Wire = builder::rsweep(
        &vertex,
        Point3::new(0.0, 1.0, -1.0),
        Vector3::unit_z(),
        Rad(7.0),
    );
    let disk: Face = builder::try_attach_plane(&vec![circle]).expect("cannot attach plane");
    builder::tsweep(&disk, 2.0 * Vector3::unit_z())
}
}
examples/cylinder.rs
fn main() {
    let cylinder = truck_brep::cylinder();
    truck_brep::save_obj(&cylinder, "output/cylinder.obj").unwrap();
    truck_brep::save_step(&cylinder, "output/cylinder.step").unwrap();
}
Higher Level Modeling (Bottle)
Model a bottle using Truck’s lower-level B-rep APIs (inspired by the classic OCCT bottle tutorial), keeping geometry and exports in the library just like the cube/torus/cylinder pages.
Build a bottle with arcs, homotopy, sweeps, and glue ops
- Spin + cap: rotational sweep for neck circles, then cap with
try_attach_plane - Side loft: arcs →
homotopy→ swept body shell - Glue: punch ceiling hole and stitch neck shell onto body
- Hollowing: offset inner shell, invert faces, sew into outer body
src/bottle.rs
Keep helpers in src/lib.rs, and the bottle shape in its own file (sibling to lib.rs).
#![allow(unused)]
fn main() {
use std::f64::consts::PI;
use truck_modeling::builder;
use truck_modeling::*;
}
1. Neck shell helper (cylinder)
#![allow(unused)]
fn main() {
/// Shell for the neck or inner neck.
pub fn cylinder(bottom: f64, height: f64, radius: f64) -> Shell {
    let vertex = builder::vertex(Point3::new(0.0, bottom, radius));
    let circle = builder::rsweep(&vertex, Point3::origin(), Vector3::unit_y(), Rad(7.0));
    let disk = builder::try_attach_plane(&vec![circle]).unwrap();
    let solid = builder::tsweep(&disk, Vector3::new(0.0, height, 0.0));
    solid.into_boundaries().pop().unwrap() // extract shell
}
}
How cylinder() works
- Rotate a single vertex around the +Y axis to generate a circular wire at the chosen radius.
- Seal that wire into a planar disk using
try_attach_plane. - Sweep the disk upward along +Y to form a solid, then extract its outer shell.
2. Body shell helper (body_shell)
#![allow(unused)]
fn main() {
/// Outer/inner body shell built from arcs, homotopy, and sweep.
pub fn body_shell(bottom: f64, height: f64, width: f64, thickness: f64) -> Shell {
    let v0 = builder::vertex(Point3::new(-width / 2.0, bottom, thickness / 4.0));
    let v1 = builder::vertex(Point3::new(width / 2.0, bottom, thickness / 4.0));
    let transit = Point3::new(0.0, bottom, thickness / 2.0);

    let arc0 = builder::circle_arc(&v0, &v1, transit);
    let arc1 = builder::rotated(&arc0, Point3::origin(), Vector3::unit_y(), Rad(PI));

    let face = builder::homotopy(&arc0, &arc1.inverse());
    let solid = builder::tsweep(&face, Vector3::new(0.0, height, 0.0));
    solid.into_boundaries().pop().unwrap()
}
}
How body_shell() works
- Construct two symmetric arcs across the body width (
arc0, andarc1rotated 180°). - Loft between the arcs using
homotopyto generate a smooth side surface. - Sweep that surface upward along +Y to create the body shell, then extract it.
3. Glue neck onto body (glue_body_neck)
#![allow(unused)]
fn main() {
/// Punch a hole in the ceiling and glue neck faces on top.
pub fn glue_body_neck(body: &mut Shell, neck: Shell) {
    let body_ceiling = body.last_mut().unwrap();
    let wire = neck[0].boundaries()[0].clone();

    // This boundary punch is the ceiling hole for the neck.
    body_ceiling.add_boundary(wire);       // punch hole for neck
    body.extend(neck.into_iter().skip(1)); // add remaining neck faces
}
}
How glue_body_neck() works
- Select the top face of the body (
body_ceiling) and the rim wire from the neck shell. - Insert the rim as an inner boundary to cut the neck opening in the ceiling face.
- Attach the remaining neck faces to the body shell.
4. Assemble the full bottle (bottle)
#![allow(unused)]
fn main() {
/// Hollow bottle with inner cavity and neck.
pub fn bottle(height: f64, width: f64, thickness: f64) -> Solid {
    let mut body = body_shell(-height / 2.0, height, width, thickness);
    let neck = cylinder(height / 2.0, height / 10.0, thickness / 4.0);
    glue_body_neck(&mut body, neck);

    let eps = height / 50.0;

    // Inner shell (shrunk and inset)
    let mut inner_body = body_shell(
        -height / 2.0 + eps,
        height - 2.0 * eps,
        width - 2.0 * eps,
        thickness - 2.0 * eps,
    );
    let inner_neck = cylinder(
        height / 2.0 - eps,
        height / 10.0 + eps,
        thickness / 4.0 - eps,
    );
    glue_body_neck(&mut inner_body, inner_neck);

    // Flip inner faces inward and sew into outer shell
    inner_body.face_iter_mut().for_each(|face| face.invert());
    let inner_ceiling = inner_body.pop().unwrap();
    let wire = inner_ceiling.into_boundaries().pop().unwrap();
    let ceiling = body.last_mut().unwrap();
    ceiling.add_boundary(wire);
    body.extend(inner_body.into_iter());

    Solid::new(vec![body])
}
}
How bottle() works
- Construct the outer body and attach the neck shell.
- Create a slightly smaller inner body and neck, attach them, then invert their faces.
- Move the inner rim to the outer ceiling as a boundary hole and stitch in the inner shell.
- Package the resulting shell hierarchy into a
Solid.
Update src/lib.rs to expose bottle
#![allow(unused)]
fn main() {
pub mod bottle;
pub use bottle::bottle;
}
Example entry point
examples/bottle.rs just calls into the library:
fn main() {
    let bottle = truck_brep::bottle(2.0, 1.0, 0.6);
    truck_brep::save_obj(&bottle, "output/bottle.obj").unwrap();
    truck_brep::save_step(&bottle, "output/bottle.step").unwrap();
}
Directory tree (for this section)
truck_brep/
├─ src/
│  ├─ lib.rs      # helpers + re-exports
│  ├─ cube.rs
│  ├─ torus.rs
│  ├─ cylinder.rs
│  └─ bottle.rs   # this section
├─ examples/
│  ├─ cube.rs
│  ├─ torus.rs
│  ├─ cylinder.rs
│  └─ bottle.rs
└─ output/        # created at runtime
Complete code
src/lib.rs
#![allow(unused)]
fn main() {
use std::{fs, io, path::Path};

use truck_meshalgo::prelude::*;
use truck_modeling::*;
use truck_stepio::out::{CompleteStepDisplay, StepModel};
use truck_topology::compress::{CompressedShell, CompressedSolid};

pub mod cube;
pub use cube::cube;

pub mod torus;
pub use torus::torus;

pub mod cylinder;
pub use cylinder::cylinder;

pub mod bottle;
pub use bottle::bottle;

/// Helper to compress modeling shapes into STEP-compatible data.
pub trait StepCompress {
    type Compressed;
    fn compress_for_step(&self) -> Self::Compressed;
}

impl StepCompress for Shell {
    type Compressed = CompressedShell<Point3, Curve, Surface>;
    fn compress_for_step(&self) -> Self::Compressed { self.compress() }
}

impl StepCompress for Solid {
    type Compressed = CompressedSolid<Point3, Curve, Surface>;
    fn compress_for_step(&self) -> Self::Compressed { self.compress() }
}

/// Export any B-rep (Solid or Shell) to STEP.
pub fn save_step<T, P>(brep: &T, path: P) -> io::Result<()>
where
    T: StepCompress,
    for<'a> StepModel<'a, Point3, Curve, Surface>: From<&'a T::Compressed>,
    P: AsRef<Path>,
{
    let path = path.as_ref();
    if let Some(parent) = path.parent() {
        fs::create_dir_all(parent)?;
    }
    let compressed = brep.compress_for_step();
    let display = CompleteStepDisplay::new(
        StepModel::from(&compressed),
        Default::default(),
    );
    fs::write(path, display.to_string())
}

/// Triangulate any B-rep (Solid or Shell) and write an OBJ mesh.
pub fn save_obj(shape: &impl MeshableShape, path: impl AsRef<Path>) -> io::Result<()> {
    let mesh = shape.triangulation(0.01).to_polygon();
    let path = path.as_ref();
    if let Some(parent) = path.parent() {
        fs::create_dir_all(parent)?;
    }
    let mut obj = fs::File::create(path)?;
    obj::write(&mesh, &mut obj).map_err(|err| io::Error::new(io::ErrorKind::Other, err))
}
}
src/bottle.rs
#![allow(unused)]
fn main() {
use std::f64::consts::PI;
use truck_modeling::builder;
use truck_modeling::*;

pub fn cylinder(bottom: f64, height: f64, radius: f64) -> Shell {
    let vertex = builder::vertex(Point3::new(0.0, bottom, radius));
    let circle = builder::rsweep(&vertex, Point3::origin(), Vector3::unit_y(), Rad(7.0));
    let disk = builder::try_attach_plane(&vec![circle]).unwrap();
    let solid = builder::tsweep(&disk, Vector3::new(0.0, height, 0.0));
    solid.into_boundaries().pop().unwrap()
}

pub fn body_shell(bottom: f64, height: f64, width: f64, thickness: f64) -> Shell {
    let v0 = builder::vertex(Point3::new(-width / 2.0, bottom, thickness / 4.0));
    let v1 = builder::vertex(Point3::new(width / 2.0, bottom, thickness / 4.0));
    let transit = Point3::new(0.0, bottom, thickness / 2.0);

    let arc0 = builder::circle_arc(&v0, &v1, transit);
    let arc1 = builder::rotated(&arc0, Point3::origin(), Vector3::unit_y(), Rad(PI));

    let face = builder::homotopy(&arc0, &arc1.inverse());
    let solid = builder::tsweep(&face, Vector3::new(0.0, height, 0.0));
    solid.into_boundaries().pop().unwrap()
}

/// Punch a hole in the ceiling and glue neck faces on top.
pub fn glue_body_neck(body: &mut Shell, neck: Shell) {
    let body_ceiling = body.last_mut().unwrap();
    let wire = neck[0].boundaries()[0].clone();

    // This boundary punch is the ceiling hole for the neck.
    body_ceiling.add_boundary(wire);
    body.extend(neck.into_iter().skip(1));
}

/// Hollow bottle with inner cavity and neck.
pub fn bottle(height: f64, width: f64, thickness: f64) -> Solid {
    let mut body = body_shell(-height / 2.0, height, width, thickness);
    let neck = cylinder(height / 2.0, height / 10.0, thickness / 4.0);
    glue_body_neck(&mut body, neck);

    let eps = height / 50.0;
    let mut inner_body = body_shell(
        -height / 2.0 + eps,
        height - 2.0 * eps,
        width - 2.0 * eps,
        thickness - 2.0 * eps,
    );
    let inner_neck = cylinder(
        height / 2.0 - eps,
        height / 10.0 + eps,
        thickness / 4.0 - eps,
    );
    glue_body_neck(&mut inner_body, inner_neck);

    inner_body.face_iter_mut().for_each(|face| face.invert());
    let inner_ceiling = inner_body.pop().unwrap();
    let wire = inner_ceiling.into_boundaries().pop().unwrap();
    let ceiling = body.last_mut().unwrap();
    ceiling.add_boundary(wire);
    body.extend(inner_body.into_iter());

    Solid::new(vec![body])
}
}
examples/bottle.rs
fn main() {
    let bottle = truck_brep::bottle(2.0, 1.0, 0.6);
    truck_brep::save_obj(&bottle, "output/bottle.obj").unwrap();
    truck_brep::save_step(&bottle, "output/bottle.step").unwrap();
}